Just create one
Crunchify.jarfile with all dependencies inside it 🙂
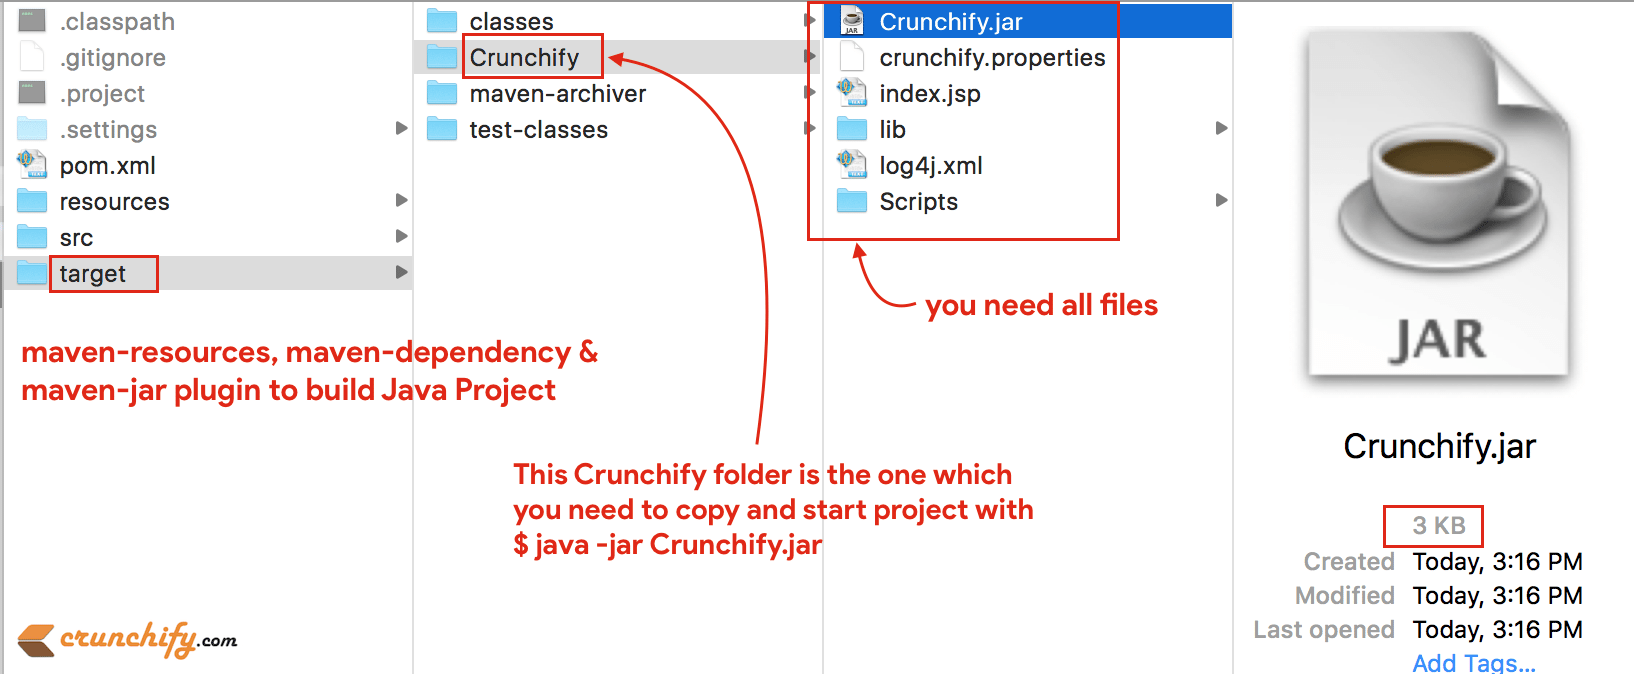
Last week I wrote a tutorial on how to use maven-resources-plugin, maven-dependency-plugin & maven-jar-plugin to generate your complete executable Jar Project? As a result it creates / copies all required files to /target/Crunchify folder.
Before: Using maven-resource, maven-dependency, maven-jar plugins:

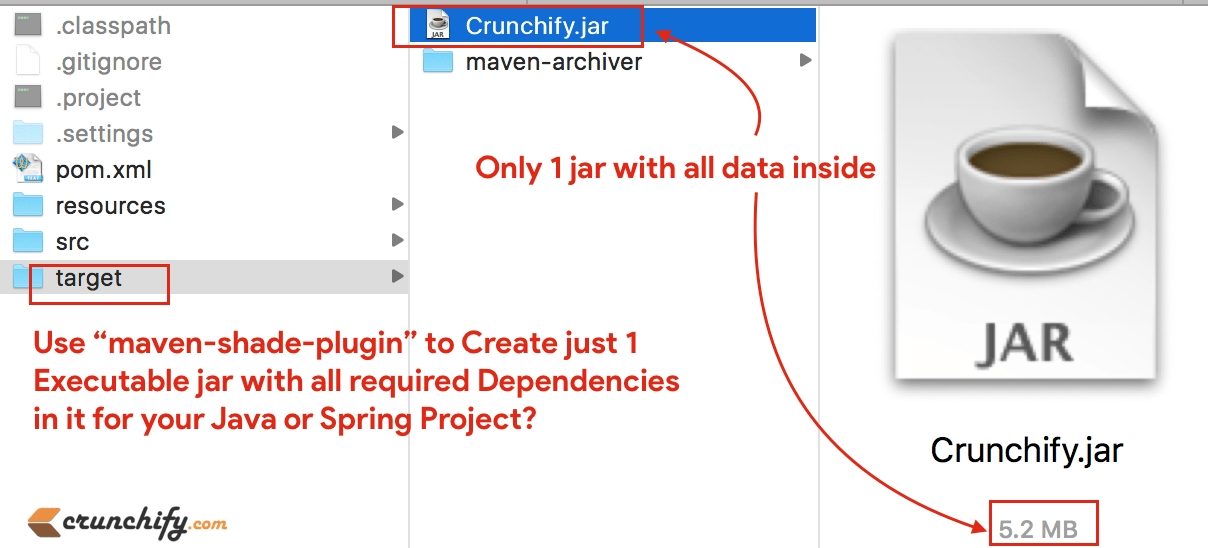
After: Using maven-shade plugin:

Let’s get started on how to achieve above result:
Here as you see, we have bundled everything from Java Project into just one file and we have given name Crunchify.jar (with all files inside).
Few days ago I had no idea on how to achieve that as I wanted to create a runnable binary distribution of a standalone Java application by using Maven. In other words:
- How to create spring-based executable jar with maven?
- Creating a Runnable Binary Distribution With Maven for Java + Spring + Other dependencies
- How to Build Java + Spring Projects with Maven?
Normally in Maven, we relies on dependency management. An artifact just contains the classes/resources of itself. Maven will be responsible to find out all artifacts (JARs etc) that the project is dependent, when compiling and for running etc.
With the help of maven-shade-plugin I was able to achieve this goal. It provides the capability to package the artifact in an uber-jar (One major file jar), including its dependencies and to shade – i.e. rename – the packages of some of the dependencies.
In my project I’ve so many other dependencies, i.e. Spring Framework, JSON, 3rd Party tools, etc. Below is just a sample project but my production .jar file came out to ~5.2MB big.
An
uber-jaris something that take all dependencies, and extract the content of the dependencies and put it in the one JAR, with the classes/resources of the project itself. By having such uber-jar, it iseasy for execution, because you will need only one big JAR instead of tons of small JARs to run your app. It also ease the distribution in some case.
In order to achieve this, you need to update your pom.xml file.
Step-1
Take a look at complete pom.xml file. Mainly you would be interested in <build> tag.
<project xmlns="http://maven.apache.org/POM/4.0.0" xmlns:xsi="http://www.w3.org/2001/XMLSchema-instance"
	xsi:schemaLocation="http://maven.apache.org/POM/4.0.0 http://maven.apache.org/xsd/maven-4.0.0.xsd">
	<modelVersion>4.0.0</modelVersion>
	<groupId>CrunchifyMavenBuildPlugins</groupId>
	<artifactId>CrunchifyMavenBuildPlugins</artifactId>
	<version>0.0.1-SNAPSHOT</version>
	<name>CrunchifyMavenBuildPlugins</name>

	<properties>
		<project.build.sourceEncoding>UTF-8</project.build.sourceEncoding>
	</properties>

	<dependencies>
		<dependency>
			<groupId>log4j</groupId>
			<artifactId>log4j</artifactId>
			<version>1.2.17</version>
		</dependency>
		<dependency>
			<groupId>com.googlecode.json-simple</groupId>
			<artifactId>json-simple</artifactId>
			<version>1.1</version>
		</dependency>
		<dependency>
			<groupId>axis</groupId>
			<artifactId>axis</artifactId>
			<version>1.4</version>
		</dependency>
		<dependency>
			<groupId>commons-beanutils</groupId>
			<artifactId>commons-beanutils</artifactId>
			<version>1.8.3</version>
		</dependency>
		<dependency>
			<groupId>commons-collections</groupId>
			<artifactId>commons-collections</artifactId>
			<version>3.2.1</version>
		</dependency>
		<dependency>
			<groupId>commons-configuration</groupId>
			<artifactId>commons-configuration</artifactId>
			<version>1.10</version>
		</dependency>
		<dependency>
			<groupId>commons-io</groupId>
			<artifactId>commons-io</artifactId>
			<version>2.4</version>
		</dependency>
		<dependency>
			<groupId>javax.mail</groupId>
			<artifactId>mail</artifactId>
			<version>1.4.7</version>
		</dependency>
		<dependency>
			<groupId>javax.servlet</groupId>
			<artifactId>servlet-api</artifactId>
			<version>2.5</version>
		</dependency>
		<dependency>
			<groupId>org.json</groupId>
			<artifactId>json</artifactId>
			<version>20140107</version>
		</dependency>
		<dependency>
			<groupId>axis</groupId>
			<artifactId>axis-saaj</artifactId>
			<version>1.4</version>
		</dependency>
		<dependency>
			<groupId>wsdl4j</groupId>
			<artifactId>wsdl4j</artifactId>
			<version>1.6.3</version>
		</dependency>
		<dependency>
			<groupId>com.google.zxing</groupId>
			<artifactId>core</artifactId>
			<version>2.0</version>
		</dependency>
	</dependencies>

	<build>
		<pluginManagement>
			<plugins>
				<plugin>
					<groupId>org.apache.maven.plugins</groupId>
					<artifactId>maven-compiler-plugin</artifactId>
					<version>2.3.1</version>
					<configuration>
						<source>1.7</source>
						<target>1.7</target>
					</configuration>
				</plugin>
			</plugins>
		</pluginManagement>
		<plugins>
			<plugin>
				<groupId>org.apache.maven.plugins</groupId>
				<artifactId>maven-shade-plugin</artifactId>
				<version>1.7</version>
				<executions>
					<execution>
						<phase>package</phase>
						<goals>
							<goal>shade</goal>
						</goals>
						<configuration>
							<!-- Optional Start -->
							<finalName>Crunchify</finalName>
							<shadedArtifactAttached>true</shadedArtifactAttached>
							<shadedClassifierName>jar-with-dependencies</shadedClassifierName>
							<!-- Optional End -->

							<transformers>
								<transformer implementation="org.apache.maven.plugins.shade.resource.ManifestResourceTransformer">
									<mainClass>com.crunchify.tutorial.CrunchifyMain</mainClass>
								</transformer>
								<transformer implementation="org.apache.maven.plugins.shade.resource.AppendingTransformer">
			     <resource>META-INF/spring.handlers</resource>
								</transformer>
								<transformer implementation="org.apache.maven.plugins.shade.resource.AppendingTransformer">
									     <resource>META-INF/spring.schemas</resource>
								</transformer>
								<transformer implementation="org.apache.maven.plugins.shade.resource.AppendingTransformer">
			     <resource>META-INF/spring.tooling</resource>
								</transformer>
							</transformers>
						</configuration>
					</execution>
				</executions>
			</plugin>

		</plugins>
	</build>
</project>
As you can see here I’m using Resource Transformers in pom.xml file. Aggregating classes/resources from several artifacts into one Crunchify JAR is straight forward as long as there is no overlap. Otherwise, some kind of logic to merge resources from several JARs is required. This is where resource transformers kick in.
Step-2
Once you add maven-shade-plugin to your pom.xml file then just use below command to build your project.
mvn clean install
And you should see one Crunchify.jar (uber-jar) file created with all dependencies mentioned in pom.xml file inside.
Step-3
Go to your project’s target folder and you would see Crunchify.jar file created. Just use command.
$bash> java -jar Crunchify.jar to execute your project.
Do you have anything to add? Add it to comment section below. Enjoy, Have a great day ahead and Happy Coding.
