Maven is pretty amazing. With so many plugins it is one of the Best Java Build tool in the market right now.
I use it in all of my projects and heavily depends on it. Build possibilities are endless. Some time back I’ve written different tutorials on so many other maven plugins and in this one we will go over maven-assembly-plugin.
Maven Assembly Plugin relies on the provided assembly descriptors to dictate its execution.
Here is a list of previous maven plugins tutorial:
maven-war-plugin– Create project .war file.maven-resources-plugin,maven-dependency-plugin&maven-jar-plugin– Build Java Project including all Dependencies?maven-shade-plugin– Create Java+Spring Based executable .jar with all Required Dependencies, Properties and Resources.
Do you have any of below questions? This tutorial will work for it too.
- How to create a jar file with Maven?
- How to use maven to create jar file with dependencies
- Use pom.xml to create jar
- Best way to create maven jar without dependencies
- How to create maven jar including dependencies
Let’s get started with maven-assembly-plugin
Step-1
Create New Maven project in Eclipse environment. Name it as CrunchifyMavenBuildPlugins. If you have existing Dynamic Web Project or Java Project then using these steps you could convert project to maven project. After converting project to Maven you should see pom.xml file generated which we need for this tutorial.
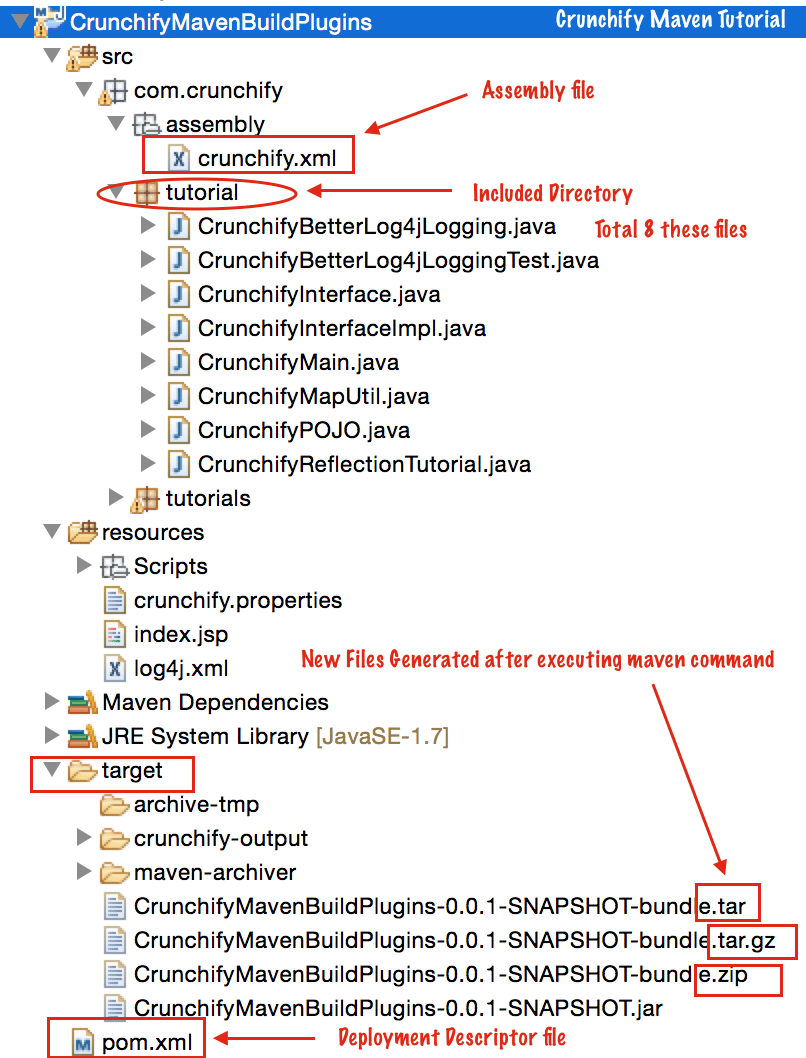
Here is my project structure. I’m using my existing project which has total 8 java files under /src/com/crunchify/tutorials package.

Step-2
Open your project’s pom.xml file add new <plugin></plugin> mainly line 28 to 38.
<project xmlns="http://maven.apache.org/POM/4.0.0" xmlns:xsi="http://www.w3.org/2001/XMLSchema-instance"
	xsi:schemaLocation="http://maven.apache.org/POM/4.0.0 http://maven.apache.org/xsd/maven-4.0.0.xsd">
	<modelVersion>4.0.0</modelVersion>
	<groupId>CrunchifyMavenBuildPlugins</groupId>
	<artifactId>CrunchifyMavenBuildPlugins</artifactId>
	<version>0.0.1-SNAPSHOT</version>
	<name>CrunchifyMavenBuildPlugins</name>

	<properties>
		<project.build.sourceEncoding>UTF-8</project.build.sourceEncoding>
	</properties>

	<dependencies>
		<dependency>
			<groupId>wsdl4j</groupId>
			<artifactId>wsdl4j</artifactId>
			<version>1.6.3</version>
		</dependency>
		<dependency>
			<groupId>com.google.zxing</groupId>
			<artifactId>core</artifactId>
			<version>2.0</version>
		</dependency>
	</dependencies>

	<build>
		<plugins>
			<plugin>
				<artifactId>maven-assembly-plugin</artifactId>
				<version>2.5.3</version>
				<configuration>
					<descriptors>
						<descriptor>src/com/crunchify/assembly/crunchify.xml</descriptor>
					</descriptors>
					<tarLongFileMode>posix</tarLongFileMode>
				</configuration>
			</plugin>
		</plugins>
	</build>
</project>
Step-3
Create new file crunchify.xml and put it under /src/com/crunchify/assembly package. We have referred this file already in above pom.xml file.
<assembly
	xmlns="http://maven.apache.org/plugins/maven-assembly-plugin/assembly/1.1.2"
	xmlns:xsi="http://www.w3.org/2001/XMLSchema-instance"
	xsi:schemaLocation="http://maven.apache.org/plugins/maven-assembly-plugin/assembly/1.1.2 http://maven.apache.org/xsd/assembly-1.1.2.xsd">
	<id>bundle</id>
	<formats>
		<format>tar.gz</format>
		<format>zip</format>
		<format>tar</format>
	</formats>
	<includeBaseDirectory>false</includeBaseDirectory>
	<fileSets>
		<fileSet>
			<directory>src/com/crunchify/tutorial</directory>
			<outputDirectory>crunchify-output</outputDirectory>
		</fileSet>
	</fileSets>
</assembly>
Here we are exporting our project into 3 different <formats>
- tar.gz
- zip
- tar
<directory> tag shows that – get everything under package src/com/crunchify/tutorial and put it under crunchify-output folder which is mentioned under <outputDirectory> tag.
If you want to include everything like /src or /resource folder contents then you could use below below different variations:
- <directory>
src/com/crunchify/tutorial</directory> - <directory>
src</directory> : everything under src folder - <directory>
resources</directory> : everything under resources folder - <directory>
/</directory> : everything
Step-4
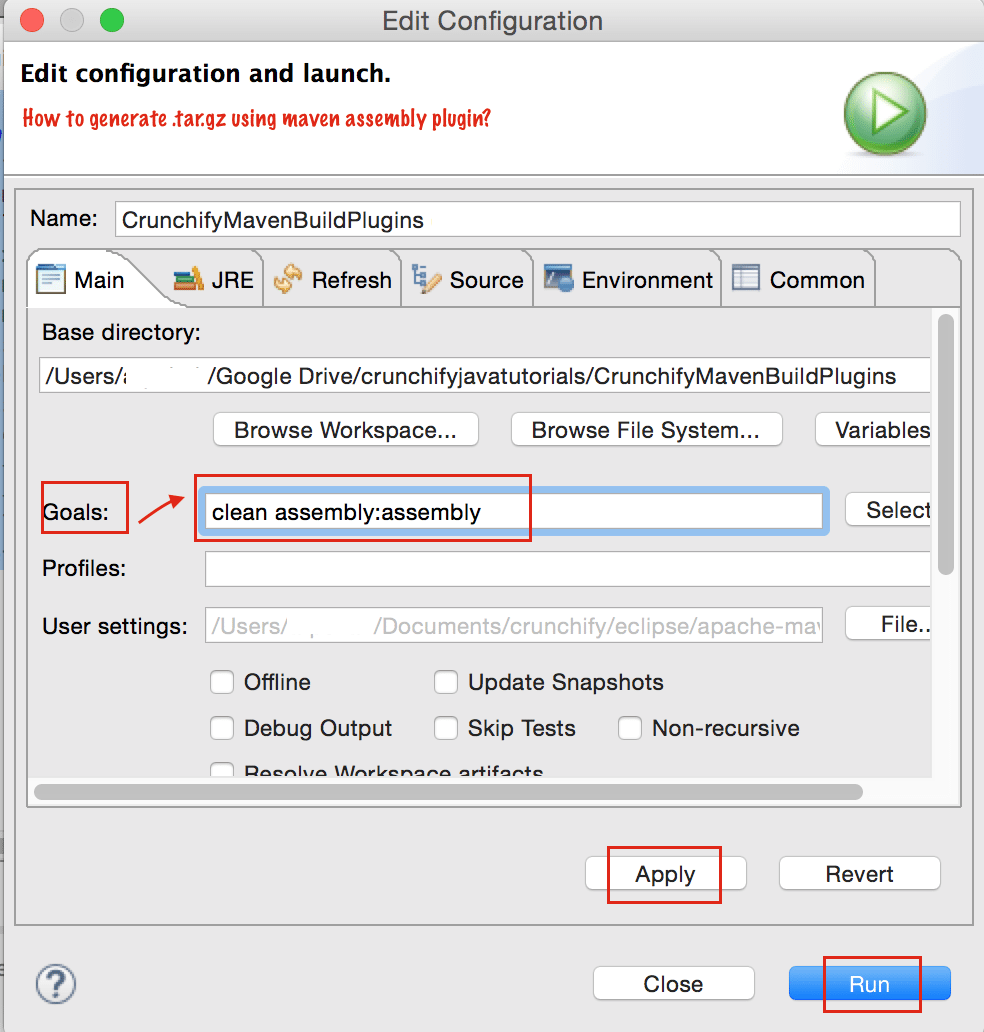
Right click on project CrunchifyMavenBuildPlugins => Run As => Maven build

- Provide Goals as
clean assembly:assembly - Click
Apply - Click
Run

Step-5
You should see BUILD SUCCESS message on console.
[INFO] --- maven-assembly-plugin:2.5.3:assembly (default-cli) @ CrunchifyMavenBuildPlugins ---
[INFO] Reading assembly descriptor: src/com/crunchify/assembly/crunchify.xml
[INFO] Building tar: /Users/crunchifyjavatutorials/CrunchifyMavenBuildPlugins/target/CrunchifyMavenBuildPlugins-0.0.1-SNAPSHOT-bundle.tar.gz
[INFO] Building zip: /Users/crunchifyjavatutorials/CrunchifyMavenBuildPlugins/target/CrunchifyMavenBuildPlugins-0.0.1-SNAPSHOT-bundle.zip
[INFO] Building tar: /Users/crunchifyjavatutorials/CrunchifyMavenBuildPlugins/target/CrunchifyMavenBuildPlugins-0.0.1-SNAPSHOT-bundle.tar
[INFO] ------------------------------------------------------------------------
[INFO] BUILD SUCCESS
[INFO] ------------------------------------------------------------------------
[INFO] Total time: 1.719 s
Step-6
NOTE: you don’t have to perform this step.

Are you getting this error? If you see this error message while building assembly then you have to add below line to pom.xml file.
<tarLongFileMode>posix</tarLongFileMode>
I got above error on my 1st attempt. So already added tarLongFileMode to above pom.xml file.
Step-7
Now how to verify? Please go to your project’s target folder and run below command to see your .tag.gz file contents.
bash-3.2$ tar zxvf CrunchifyMavenBuildPlugins-0.0.1-SNAPSHOT-bundle.tar.gz

Let me know if you have any question and face any issue running this.
