Why Spring Boot? What Spring Boot is used for?
Want to create java based micro services for your application? Well, Spring boot is an open source java based solution for the same 🙂
It is used to build production ready Spring based application created by Pivotal team.
Spring Boot idea is very simple. It provides pre-configured set of functionality and framework with you could publish your first Spring Boot based Web Application with just few lines of code. Just with simple one command you could launch and test your web application.
Set of all custom configurations, Database setups, 3rd party modules comes out-0f-the-box in Spring Boot.
Like we have very popular Hello World Spring MVC tutorial, we will also start our Hello World Spring Boot tutorial similar way.
Getting started with Spring Boot:
- This is your Spring Boot Tutorial For Beginners
- Hello World Spring Boot Tutorial
- Simplest Spring Boot Example
- spring boot maven tutorial
- spring boot web application example
Let’s get started.
Step-1
In order to get started with Spring Boot, you are going to need below setups.
- JDK 8. Make sure you
download and installlatest JDK. - Eclipse IDE. Make sure you download
Eclipse IDE for Java EE Developers. official download link. - Spring Boot 2.4.3.
Step-2
Once you install Eclipse on your Laptop / Desktop, go to Eclipse. We are going to create new Dynamic Web Project.
- Click on File
- New
Dynamic Web Project- On first screen provide project name:
CrunchifySpringBootHelloWorld
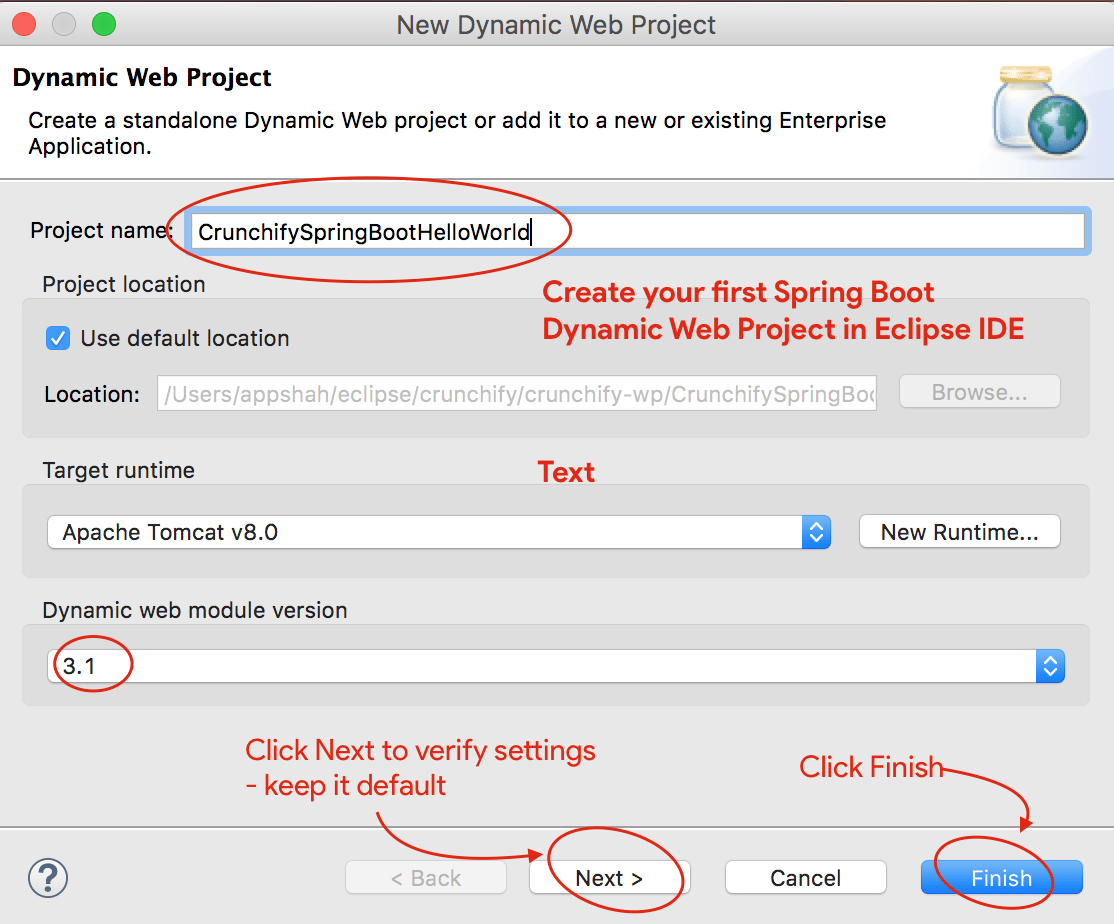
- Make sure you have Dynamic Web module version to
3.1and Target runtime Apache Tomcat 8. - If you don’t have Apache Tomcat setup already then follow these steps to setup Tomcat in Eclipse.
- Click on Next two times and make sure settings are same as these one. Screenshot1, Screenshot2.
- OR click on Finish to create Dynamic Web Project.
Step-3
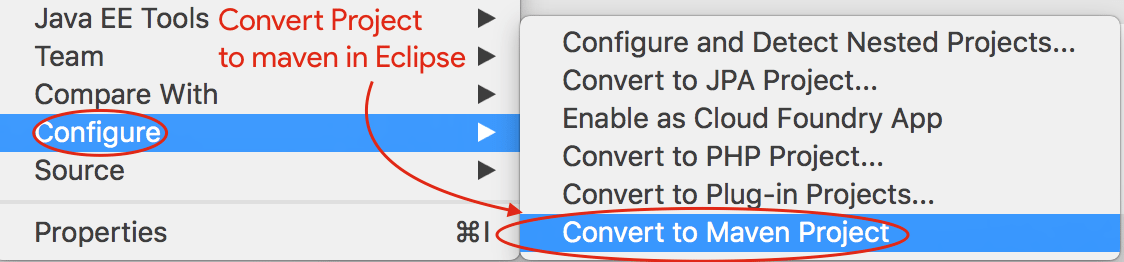
Next step is to Convert Java Project to Maven Project.
- Right click on project
- Click on Configure
- Click on
Convert to Maven Project - Keep the default configuration
- Click finish
Step-4
Above step will create pom.xml file for your project. Next step is to update pom.xml file with below content and add Spring Boot Dependency.
<project xmlns="http://maven.apache.org/POM/4.0.0" xmlns:xsi="http://www.w3.org/2001/XMLSchema-instance"
	xsi:schemaLocation="http://maven.apache.org/POM/4.0.0 http://maven.apache.org/xsd/maven-4.0.0.xsd">
	<modelVersion>4.0.0</modelVersion>
	<groupId>CrunchifySpringBootHelloWorld</groupId>
	<artifactId>CrunchifySpringBootHelloWorld</artifactId>
	<version>1.0.0-RELEASE</version>
	<packaging>war</packaging>
	<parent>
		<groupId>org.springframework.boot</groupId>
		<artifactId>spring-boot-starter-parent</artifactId>
		<version>2.4.3</version>
	</parent>

	<dependencies>
		<dependency>
			<groupId>org.springframework.boot</groupId>
			<artifactId>spring-boot-starter-web</artifactId>
		</dependency>
	</dependencies>

	<properties>
		<java.version>1.8</java.version>
	</properties>


	<build>
		<sourceDirectory>src</sourceDirectory>
		<plugins>
			<plugin>
				<artifactId>maven-compiler-plugin</artifactId>
				<configuration>
					<source>1.8</source>
					<target>1.8</target>
				</configuration>
			</plugin>

			<plugin>
				<groupId>org.springframework.boot</groupId>
				<artifactId>spring-boot-maven-plugin</artifactId>
			</plugin>

			<plugin>
				<artifactId>maven-war-plugin</artifactId>
				<configuration>
					<warSourceDirectory>WebContent</warSourceDirectory>
				</configuration>
			</plugin>
		</plugins>
	</build>
</project>
As you see above, we are adding org.springframework.boot 2.4.3 jar into our project. In addition that we are adding two more artifacts:
- spring-boot-maven-plugin
- spring-boot-starter-web
Step-5
Now let’s work on creating simple Hello World Application file which we will be able to access using URLs
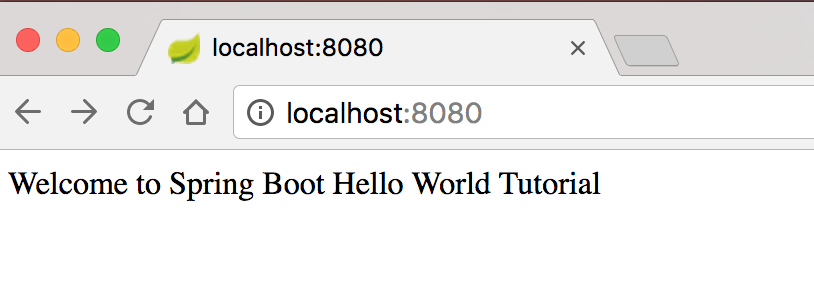
- http://locahost:8080
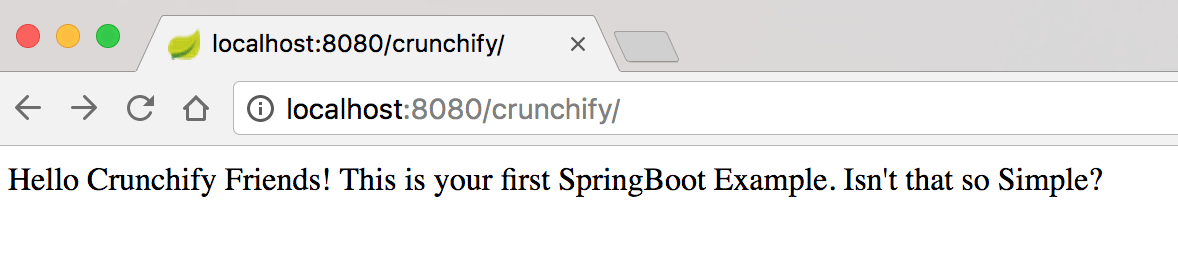
- http://locahost:8080/crunchify
Create file CrunchifyHelloWorldSpringBoot.java with below code contents:
package crunchify.com.springboot;

import org.springframework.boot.SpringApplication;
import org.springframework.boot.autoconfigure.EnableAutoConfiguration;
import org.springframework.web.bind.annotation.RequestMapping;
import org.springframework.web.bind.annotation.RestController;

/**
 * @author Crunchify.com - Simple Spring Boot Example
 *
 */

// @RestController is a convenience annotation that is itself annotated with @Controller and @ResponseBody
@RestController

// @EnableAutoConfiguration enables auto-configuration of the Spring Application Context, attempting to guess
// and configure beans that you are likely to need.
@EnableAutoConfiguration
public class CrunchifyHelloWorldSpringBoot {

	// @RequestMapping annotation is used for mapping web requests onto specific handler classes
	@RequestMapping("/")
	String basicURL() {
		return "Welcome to Spring Boot Hello World Tutorial";
	}

	@RequestMapping("crunchify")
	String crunchifyURL() {
		return "Hello Crunchify Friends! This is your first SpringBoot Example. Isn't that so Simple?";
	}

	public static void main(String[] args) throws Exception {

		// SpringApplication classes that can be used to bootstrap and launch a Spring application from a Java
		// main method. By default class will perform the following steps to bootstrap your application.
		SpringApplication.run(CrunchifyHelloWorldSpringBoot.class, args);
	}

}
Once you add above java file, your Eclipse project structure should look like this:

Step-6
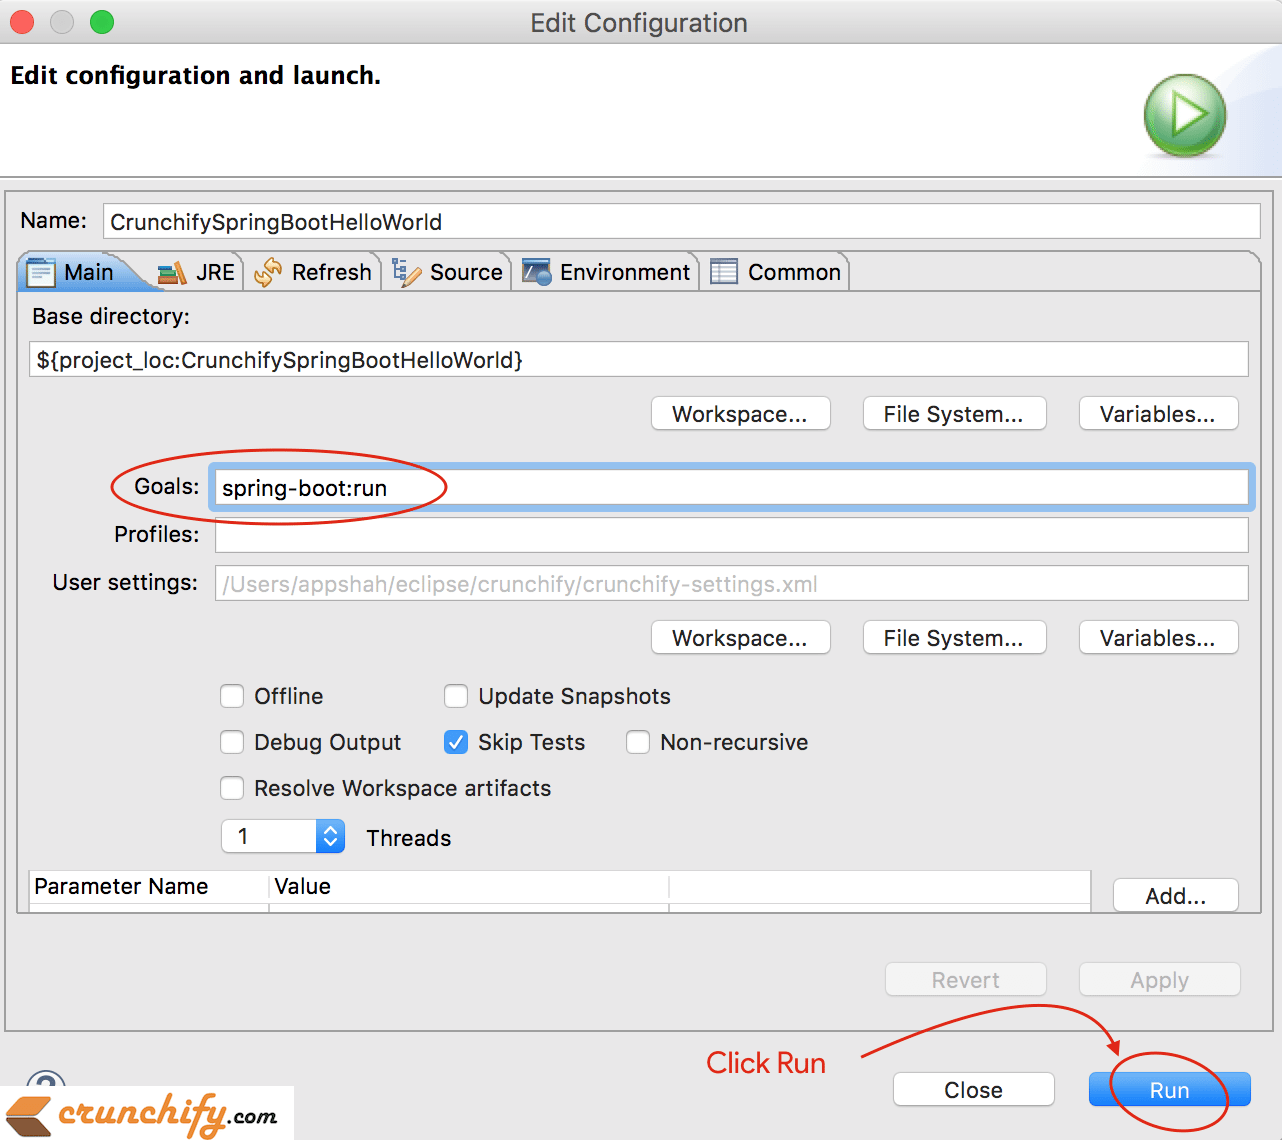
Now using simple spring-boot:run maven command you could start your Spring Boot Application.
- Right click on project
- Click on
Run As -> Maven build...
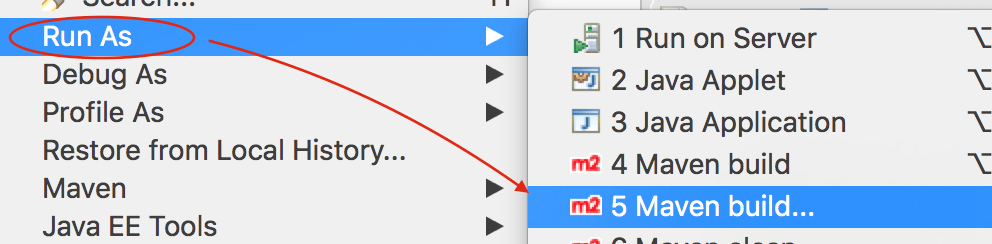
Next Windows keep default configuration and provide goal as spring-boot:run as you see in below image.
Step-7
Make sure you don’t have any error in Eclipse console. Here is a console output from Eclipse IDE.
SLF4J: Class path contains multiple SLF4J bindings.
SLF4J: Found binding in [jar:file:/Applications/Eclipse.app/Contents/Eclipse/plugins/org.eclipse.m2e.maven.runtime.slf4j.simple_1.16.0.20200610-1735/jars/slf4j-simple-1.7.5.jar!/org/slf4j/impl/StaticLoggerBinder.class]
SLF4J: Found binding in [file:/Applications/Eclipse.app/Contents/Eclipse/configuration/org.eclipse.osgi/5/0/.cp/org/slf4j/impl/StaticLoggerBinder.class]
SLF4J: See http://www.slf4j.org/codes.html#multiple_bindings for an explanation.
SLF4J: Actual binding is of type [org.slf4j.impl.SimpleLoggerFactory]
[INFO] Scanning for projects...
[INFO]
[INFO] ----< CrunchifySpringBootHelloWorld:CrunchifySpringBootHelloWorld >-----
[INFO] Building CrunchifySpringBootHelloWorld 1.0.0-RELEASE
[INFO] --------------------------------[ war ]---------------------------------
[INFO]
[INFO] >>> spring-boot-maven-plugin:2.4.3:run (default-cli) > test-compile @ CrunchifySpringBootHelloWorld >>>
[INFO]
[INFO] --- maven-resources-plugin:3.2.0:resources (default-resources) @ CrunchifySpringBootHelloWorld ---
[INFO] Using 'UTF-8' encoding to copy filtered resources.
[INFO] Using 'UTF-8' encoding to copy filtered properties files.
[INFO] skip non existing resourceDirectory /Users/app/crunchify/eclipse-workspace/CrunchifySpringBootHelloWorld/src/main/resources
[INFO] skip non existing resourceDirectory /Users/app/crunchify/eclipse-workspace/CrunchifySpringBootHelloWorld/src/main/resources
[INFO]
[INFO] --- maven-compiler-plugin:3.8.1:compile (default-compile) @ CrunchifySpringBootHelloWorld ---
[INFO] Nothing to compile - all classes are up to date
[INFO]
[INFO] --- maven-resources-plugin:3.2.0:testResources (default-testResources) @ CrunchifySpringBootHelloWorld ---
[INFO] Not copying test resources
[INFO]
[INFO] --- maven-compiler-plugin:3.8.1:testCompile (default-testCompile) @ CrunchifySpringBootHelloWorld ---
[INFO] Not compiling test sources
[INFO]
[INFO] <<< spring-boot-maven-plugin:2.4.3:run (default-cli) < test-compile @ CrunchifySpringBootHelloWorld <<<
[INFO]
[INFO]
[INFO] --- spring-boot-maven-plugin:2.4.3:run (default-cli) @ CrunchifySpringBootHelloWorld ---
[INFO] Attaching agents: []

  .   ____          _            __ _ _
 /\\ / ___'_ __ _ _(_)_ __  __ _ \ \ \ \
( ( )\___ | '_ | '_| | '_ \/ _` | \ \ \ \
 \\/  ___)| |_)| | | | | || (_| |  ) ) ) )
  '  |____| .__|_| |_|_| |_\__, | / / / /
 =========|_|==============|___/=/_/_/_/
 :: Spring Boot ::                (v2.4.3)

2021-02-21 21:05:10.614  INFO 36654 --- [           main] c.c.s.CrunchifyHelloWorldSpringBoot      : Starting CrunchifyHelloWorldSpringBoot using Java 15 on LM-AUN-11021095 with PID 36654 (/Users/app/crunchify/eclipse-workspace/CrunchifySpringBootHelloWorld/target/classes started by arpshah in /Users/app/crunchify/eclipse-workspace/CrunchifySpringBootHelloWorld)
2021-02-21 21:05:10.616  INFO 36654 --- [           main] c.c.s.CrunchifyHelloWorldSpringBoot      : No active profile set, falling back to default profiles: default
2021-02-21 21:05:11.008  INFO 36654 --- [           main] o.s.b.w.embedded.tomcat.TomcatWebServer  : Tomcat initialized with port(s): 8080 (http)
2021-02-21 21:05:11.014  INFO 36654 --- [           main] o.apache.catalina.core.StandardService   : Starting service [Tomcat]
2021-02-21 21:05:11.015  INFO 36654 --- [           main] org.apache.catalina.core.StandardEngine  : Starting Servlet engine: [Apache Tomcat/9.0.43]
2021-02-21 21:05:11.054  INFO 36654 --- [           main] o.a.c.c.C.[Tomcat].[localhost].[/]       : Initializing Spring embedded WebApplicationContext
2021-02-21 21:05:11.054  INFO 36654 --- [           main] w.s.c.ServletWebServerApplicationContext : Root WebApplicationContext: initialization completed in 417 ms
2021-02-21 21:05:11.147  INFO 36654 --- [           main] o.s.s.concurrent.ThreadPoolTaskExecutor  : Initializing ExecutorService 'applicationTaskExecutor'
2021-02-21 21:05:11.241  INFO 36654 --- [           main] o.s.b.w.embedded.tomcat.TomcatWebServer  : Tomcat started on port(s): 8080 (http) with context path ''
2021-02-21 21:05:11.247  INFO 36654 --- [           main] c.c.s.CrunchifyHelloWorldSpringBoot      : Started CrunchifyHelloWorldSpringBoot in 0.843 seconds (JVM running for 1.04)
2021-02-21 21:07:04.240  INFO 36654 --- [nio-8080-exec-1] o.a.c.c.C.[Tomcat].[localhost].[/]       : Initializing Spring DispatcherServlet 'dispatcherServlet'
2021-02-21 21:07:04.240  INFO 36654 --- [nio-8080-exec-1] o.s.web.servlet.DispatcherServlet        : Initializing Servlet 'dispatcherServlet'
2021-02-21 21:07:04.241  INFO 36654 --- [nio-8080-exec-1] o.s.web.servlet.DispatcherServlet        : Completed initialization in 1 ms
Step-8
Now visit URLs http://localhost:8080 and http://locahost:8080/crunchify to see live result.
Hope this tutorial helps you get started with Java Spring Boot example. Let me know if you see any issue running your first Spring Boot application.
In the coming weeks, we will add more and more complex Spring Boot Examples for your. If you have any special requirements then let us know in comment section.