
Maven is pretty amazing, isn’t it? Well – for me at least I love using Maven in my daily Java Development practice. Maven is nothing but a plugin execution framework; all work is done by plugins.
I’ve written number of Maven tutorials on Crunchify mainly on Maven Plugins. Here are couple of them:
==> Use maven-shade-plugin to create 1 single executable jar.
==> Use maven-resources, maven-dependency and maven-jar plugins to create executable jar file with all dependencies into 1 folder.
Now how about creating .war file instead of .jar file with Maven in Eclipse? This Maven Tutorial focuses on maven-war-plugin.
Our requirement here is to generate single .war file using Maven which you could run on Apache Tomcat or any other web container.
Let’s get started:
- Create
Dynamic Web Projectin Eclipse, i.e.CrunchifyTutorial - Create simple .java file into your project, i.e.
CrunchifyWarUsingMaven.java - Convert Java Project into Maven project in Eclipse
- Add
maven-war-plugintopom.xmlfile - Run command
clean installto generate .war file
Step-1
Create Dynamic Web Project in to Eclipse, i.e. CrunchifyTutorial
Click
- File ->
- New ->
- Other ->
- Dynamic Web Project ->
- Provide ProjectName (CrunchifyTutorial)
- Click Finish
Step-2
Convert Project to Maven Project. Follow these steps: https://crunchify.com/how-to-convert-existing-java-project-to-maven-in-eclipse/
Step-3
Create simple java file named CrunchifyWarUsingMaven.java
NOTE: In your dynamic web project you must have web.xml file which represents your servlet and servlet-mapping. You could use also Simple Spring MVC project too if you want for Step-3 here. If you don’t see web.xml then you could create one by following this tutorial.
package crunchify.com.tutorials;

/**
 * @author Crunchify.com
 *
 */

public class CrunchifyWarUsingMaven {
	public static void main(String[] args) {
		System.out
				.println("Test.. Test by Crunchify.. \nThis is a simple tutorial on how to create .war file using Maven Plugin..");
	}
}
Here is a project structure. You could ignore other files and folders from below diagram 🙂

Step-4
Open your pom.xml file and update it with below code. Mainly look at line 7 and 20. We are packaging project as war using <packaging>war</packaging>.
<project xmlns="http://maven.apache.org/POM/4.0.0" xmlns:xsi="http://www.w3.org/2001/XMLSchema-instance"
	xsi:schemaLocation="http://maven.apache.org/POM/4.0.0 http://maven.apache.org/xsd/maven-4.0.0.xsd">
	<modelVersion>4.0.0</modelVersion>
	<groupId>CrunchifyTutorial</groupId>
	<artifactId>CrunchifyTutorial</artifactId>
	<version>0.0.1-SNAPSHOT</version>
	<packaging>war</packaging>
	<build>
		<sourceDirectory>src</sourceDirectory>
		<plugins>
			<plugin>
				<artifactId>maven-compiler-plugin</artifactId>
				<version>3.1</version>
				<configuration>
					<source>1.7</source>
					<target>1.7</target>
				</configuration>
			</plugin>
			<plugin>
				<artifactId>maven-war-plugin</artifactId>
				<version>2.4</version>
				<configuration>
					<warSourceDirectory>WebContent</warSourceDirectory>
					<failOnMissingWebXml>false</failOnMissingWebXml>
				</configuration>
			</plugin>
		</plugins>
	</build>
	<dependencies>
		<dependency>
			<groupId>javax.servlet</groupId>
			<artifactId>servlet-api</artifactId>
			<version>2.5</version>
		</dependency>
	</dependencies>
</project>
Step-5
Now Right Click on Project -> Run-As ->Maven Build (Number 5).

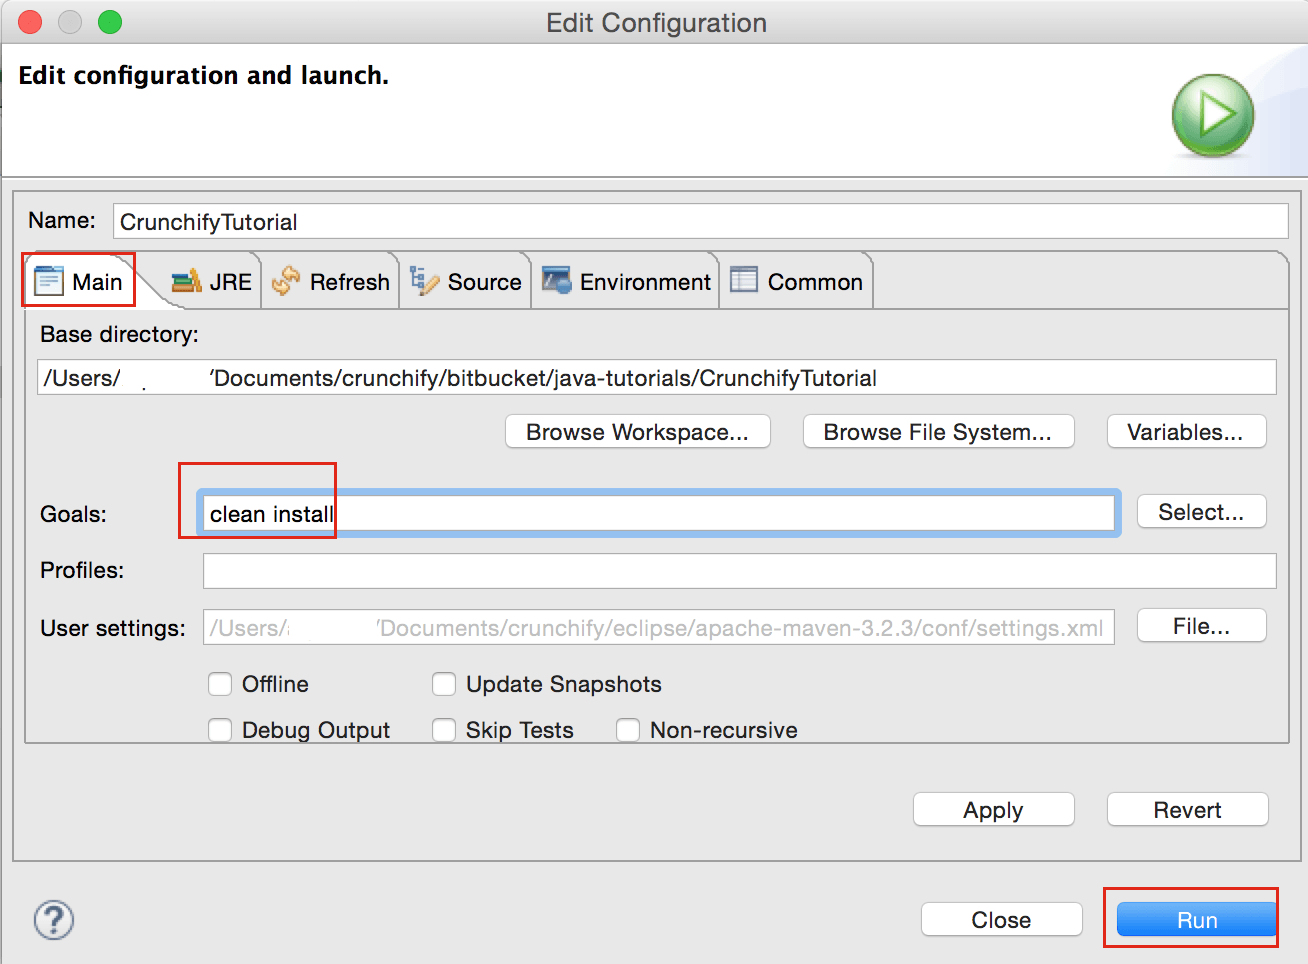
Step-6
Maven clean install on project.
Step-7
Checkout your Build result in Eclipse console.

Step-8
That’s it. Now get your .war file from /target directory and deploy into Apache Tomcat or any other Web Container.