It’s been almost 12 years I started using Apache Tomcat. I believe when I did my 1st under grade project, it was on Tomcat version 1.x. Now it’s already on version 8.0. Mostly I’ve been in touch with Tomcat Server in my daily work life, simply can’t live without it.
On Crunchify we have already published almost 40 articles on Apache Tomcat. In most of the tutorial I’ve run server on port 8080 which is default port configured in server.xml file.
In this tutorial we will go over all steps in details on how to enable HTTPS/SSL on Apache Tomcat Server.
Let’s get started:
Step-1. Create Keystore
keytool: we will generate secure key using keytool command – which is key and certificate management tool.
Command:
bash-3.2$ pwd
/Users/Shared

bash-3.2$ keytool -genkey -alias crunchify -keyalg RSA -keystore /Users/Shared/crunchify.keystore
File will be created under folder /Users/Shared.
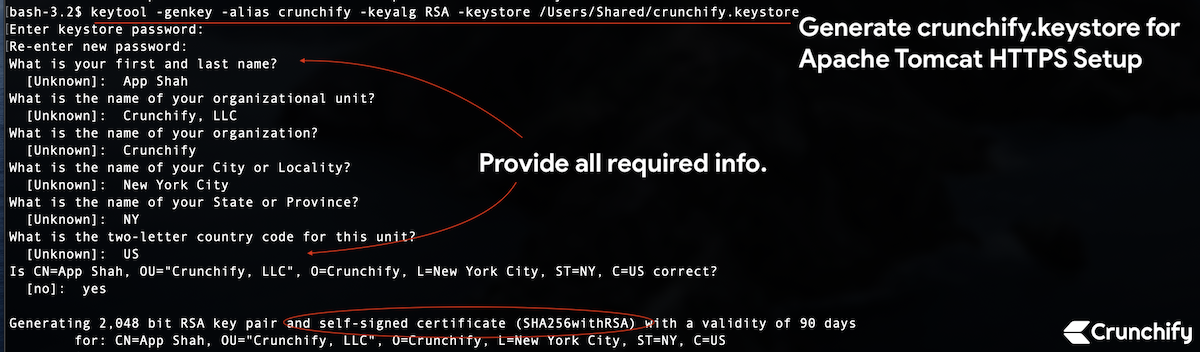
bash-3.2$ keytool -genkey -alias crunchify -keyalg RSA -keystore /Users/Shared/crunchify.keystore
Enter keystore password:
Re-enter new password:
What is your first and last name?
  [Unknown]:  App Shah
What is the name of your organizational unit?
  [Unknown]:  Crunchify, LLC
What is the name of your organization?
  [Unknown]:  Crunchify
What is the name of your City or Locality?
  [Unknown]:  New York City
What is the name of your State or Province?
  [Unknown]:  NY
What is the two-letter country code for this unit?
  [Unknown]:  US
Is CN=App Shah, OU="Crunchify, LLC", O=Crunchify, L=New York City, ST=NY, C=US correct?
  [no]:  yes

Generating 2,048 bit RSA key pair and self-signed certificate (SHA256withRSA) with a validity of 90 days
	for: CN=App Shah, OU="Crunchify, LLC", O=Crunchify, L=New York City, ST=NY, C=US
I’m using Mac OS X, so replace your path accordingly if you are on windows. I’ve used password 123456.
Step-2. Create Self Signed Certificate Signing Request
bash-3.2$ keytool -certreq -keyalg RSA -alias crunchify -file crunchify.csr -keystore crunchify.keystore
Enter keystore password:
Enter password: 123456
Step-3. Let’s check first tomcat is running on port 8080 over HTTP.
Start tomcat server using command: <tomcat_home>/bin/startup.sh.
Make sure you are in correct tomcat path location.
bash-3.2# pwd
/Users/Shared/apache-tomcat-9.0.30/bin

bash-3.2$ ./startup.sh

Using CATALINA_BASE:   /Users/Shared/apache-tomcat-9.0.30
Using CATALINA_HOME:   /Users/Shared/apache-tomcat-9.0.30
Using CATALINA_TMPDIR: /Users/Shared/apache-tomcat-9.0.30/temp
Using JRE_HOME:        /Library/Java/JavaVirtualMachines/jdk-13.0.1.jdk/Contents/Home
Using CLASSPATH:       /Users/Shared/apache-tomcat-9.0.30/bin/bootstrap.jar:/Users/Shared/apache-tomcat-9.0.30/bin/tomcat-juli.jar
Tomcat started.
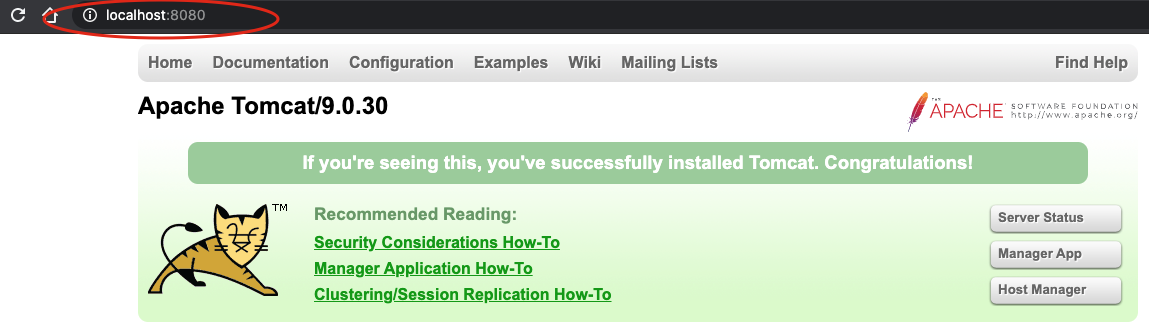
Hit URL: http://localhost:8080 to make sure server is up and running.
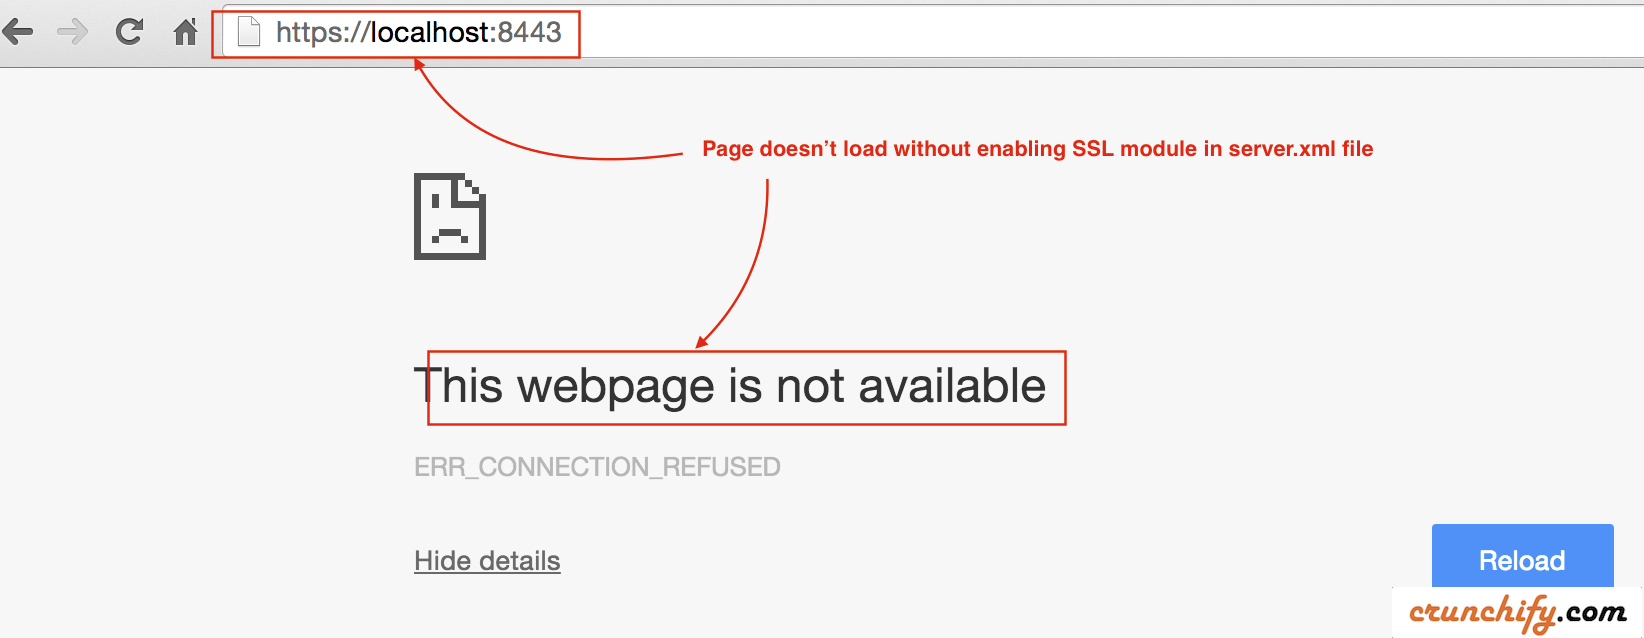
Step-4. Now check tomcat instance on port 8443 over HTTPS.
- Now check port 8443 (HTTPS/SSL URL).
- Hit URL:
https://localhost:8443 - You should see error message. Page shouldn’t load at all.
Step-5. Update /conf/server.xml file
As we have generated keystore and certificate signing request above, we need to tell tomcat to use that.
- Open
server.xmlfile which is located at<tomcat_home>/conf/folder and modify settings. - In our case it’s
/Users/Shared/apache-tomcat-9.0.30/conffolder.
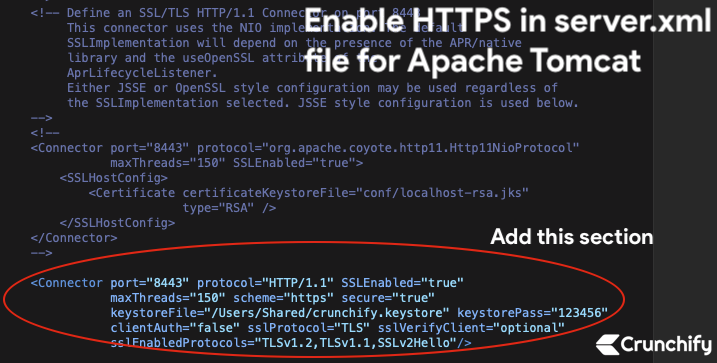
Add below section directly to server.xml file:
    <Connector port="8443" protocol="HTTP/1.1" SSLEnabled="true"
               maxThreads="150" scheme="https" secure="true"
               keystoreFile="/Users/Shared/crunchify.keystore" keystorePass="123456"
               clientAuth="false" sslProtocol="TLS" sslVerifyClient="optional"
			   sslEnabledProtocols="TLSv1.2,TLSv1.1,SSLv2Hello"/>
- Here password is
123456which I used inStep-1. - Protocol: HTTP/1.1
Save file. Next we will stop and start Tomcat Server.
Step-6. Stop and Start Apache Tomcat.
- bash-3.2$ /Users/Shared/apache-tomcat-9.0.30/bin/shutdown.sh
- bash-3.2$ /Users/Shared/apache-tomcat-9.0.30/bin/startup.sh
bash-3.2$ /Users/Shared/apache-tomcat-9.0.30/bin/shutdown.sh

Using CATALINA_BASE:   /Users/Shared/apache-tomcat-9.0.30
Using CATALINA_HOME:   /Users/Shared/apache-tomcat-9.0.30
Using CATALINA_TMPDIR: /Users/Shared/apache-tomcat-9.0.30/temp
Using JRE_HOME:        /Library/Java/JavaVirtualMachines/jdk-13.0.1.jdk/Contents/Home
Using CLASSPATH:       /Users/Shared/apache-tomcat-9.0.30/bin/bootstrap.jar:/Users/Shared/apache-tomcat-9.0.30/bin/tomcat-juli.jar
NOTE: Picked up JDK_JAVA_OPTIONS:  --add-opens=java.base/java.lang=ALL-UNNAMED --add-opens=java.base/java.io=ALL-UNNAMED --add-opens=java.rmi/sun.rmi.transport=ALL-UNNAMED

bash-3.2$ /Users/Shared/apache-tomcat-9.0.30/bin/startup.sh

Using CATALINA_BASE:   /Users/Shared/apache-tomcat-9.0.30
Using CATALINA_HOME:   /Users/Shared/apache-tomcat-9.0.30
Using CATALINA_TMPDIR: /Users/Shared/apache-tomcat-9.0.30/temp
Using JRE_HOME:        /Library/Java/JavaVirtualMachines/jdk-13.0.1.jdk/Contents/Home
Using CLASSPATH:       /Users/Shared/apache-tomcat-9.0.30/bin/bootstrap.jar:/Users/Shared/apache-tomcat-9.0.30/bin/tomcat-juli.jar
Tomcat started.
Step-7. Check HTTPS url and certification: https://localhost:8443
Now hit HTTPS secure URL again to check you page loaded successfully.
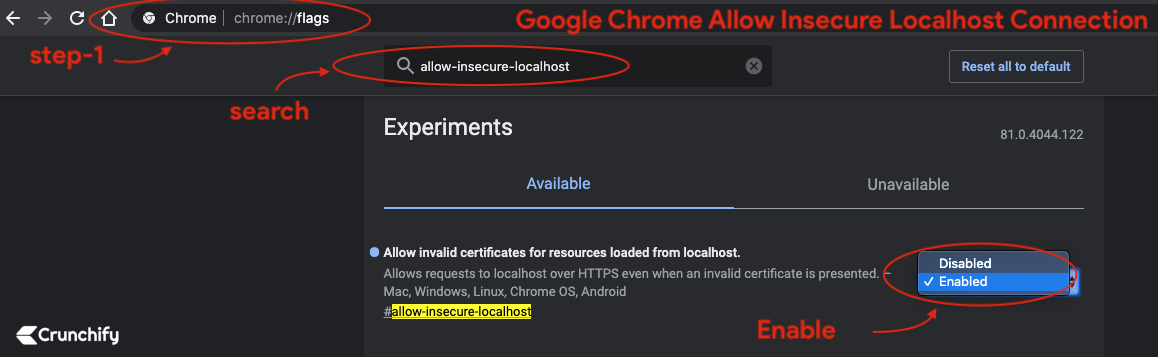
Chrome:
- By default
Chrome Blocks all insecure HTTPSsites from loading. - Enable
Chrome flagto load invalid certificates for resources loaded from localhost
- Go to Chrome
- Open Tab
- type:
chrome://flags/#allow-insecure-localhost - Enable flag from drop down
- Relaunch Chrome
Safari and Mozilla Firefox:
Accept invalid certificate errorand visit site.
You should see Apache Tomcat page loading over HTTPS on port 8443 🙂
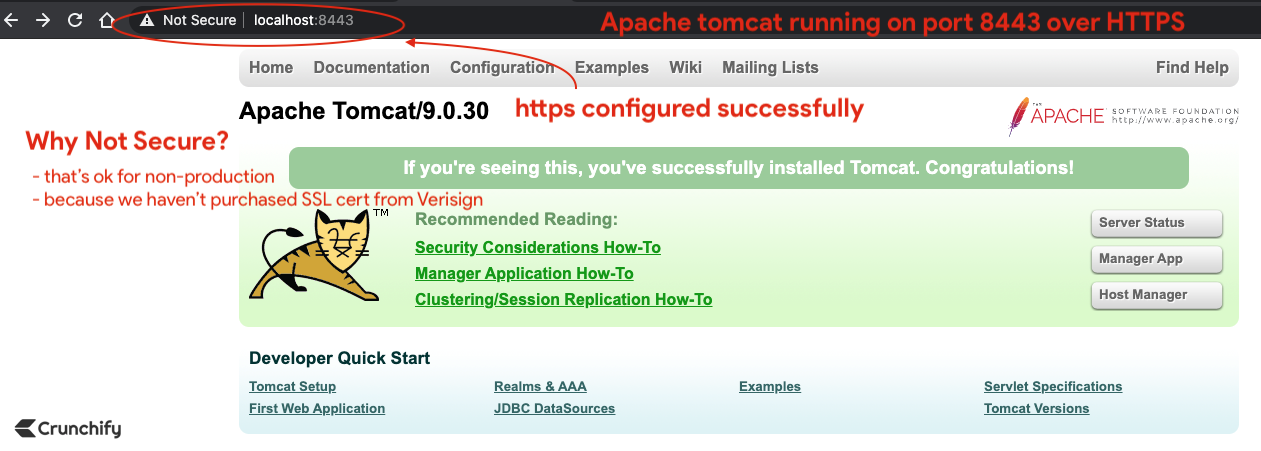
You are all set. Have you noticed red padlock? Don’t worry. We haven’t purchase SSL cert from Verisign or Comodo.
In production environment you may not see that red cross sign.
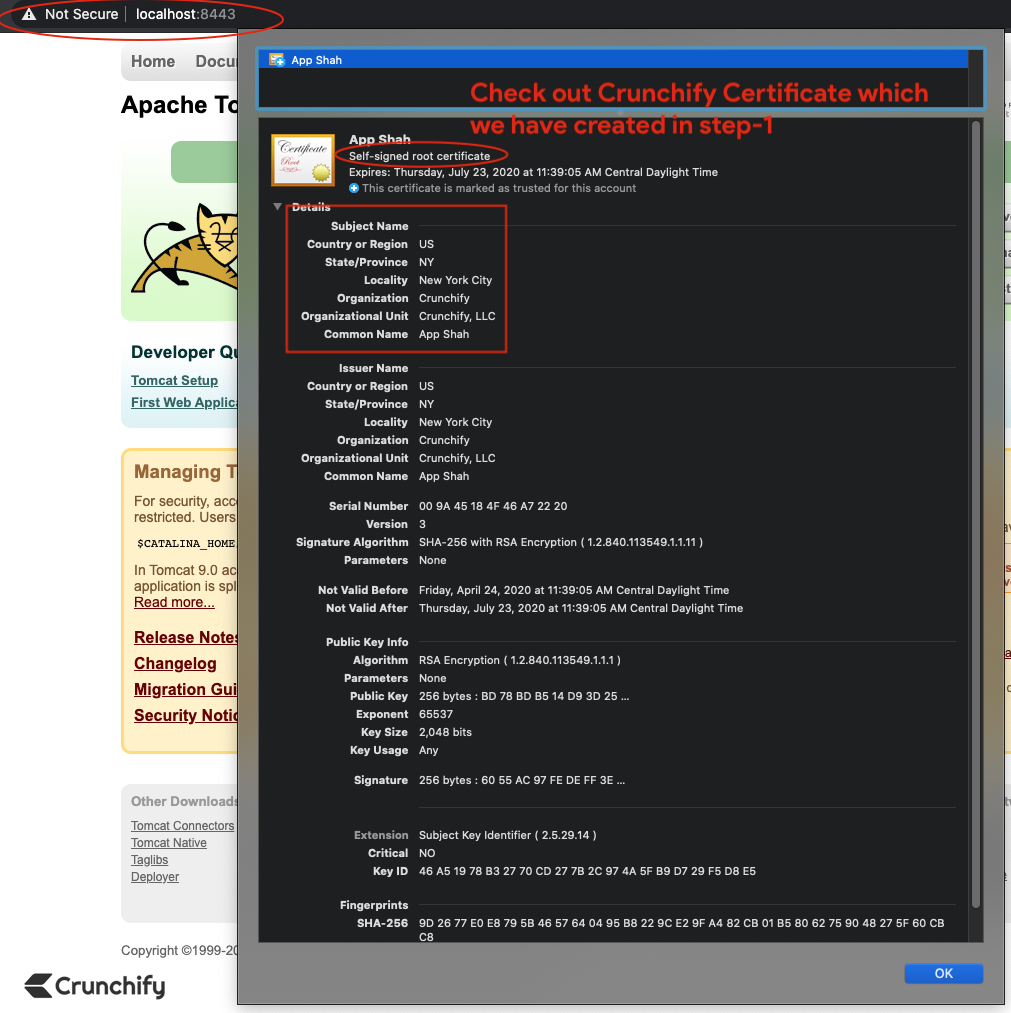
Click on certificate in browser and our default self signed certificate should be
valid for 90days.
Bonus point:
How to check your cert content using command keytool?
bash-3.2# keytool -list -keystore /Users/<username>/crunchify.keystore
Result:
bash-3.2$ keytool -list -keystore /Users/Shared/crunchify.keystore

Enter keystore password:
Keystore type: PKCS12
Keystore provider: SUN

Your keystore contains 1 entry

crunchify, Apr 24, 2020, PrivateKeyEntry,
Certificate fingerprint (SHA-256): 9D:26:77:E0:E8:79:5B:46:57:64:04:95:B8:22:9C:E2:9F:A4:82:CB:01:B5:80:62:75:90:48:27:5F:60:CB:C8

bash-3.2$
Tomcat Port is already in use error?
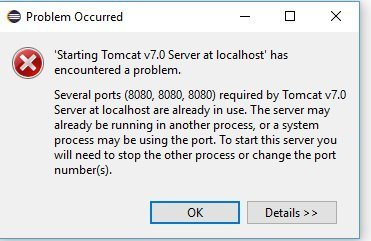
are you running Tomcat on linux/mac or Windows?
If mac/linux then you could use below commands:
bash-3.2$ ps -ef | grep tomcat
  502 55589 55587   0  6:34PM ttys001    0:00.00 grep tomcat
bash-3.2$ kill -9 55589
If windows then
You could launch Task Explorer and search for Tomcat then right click on that and Kill Process.
Hope that helps. Let me know if that doesn’t work.