I’m sure you must have faced one of below question while developing Dynamic Web Project in past.
- Running multiple Tomcat instances on one server
- Advanced Configuration – Multiple Tomcat Instances
- Running Multiple Tomcat Instances on Single Machine
- java – Running Multiple Tomcat Instances on One Windows Machine
- use multiple
CATALINA_BASEto setup tomcat 6 instances on windows
If yes, then you are at right place..
Let’s understand basic first
To run multiple Tomcat instances on one server, you can use the following steps:
- Download and extract multiple copies of the Tomcat binary distribution to different directories on your server.
- Create a unique configuration file for each instance by copying the server.xml file from the conf directory of each Tomcat instance and modifying the ports and other settings as needed.
- Create unique sets of environment variables for each instance by copying the setenv.sh (or setenv.bat) file from the bin directory of each Tomcat instance and modifying the
CATALINA_HOMEandCATALINA_BASEvariables to point to the appropriate directories for each instance. - Create unique startup and shutdown scripts for each instance by copying the startup.sh and shutdown.sh (or startup.bat and shutdown.bat) files from the bin directory of each Tomcat instance and modifying them to point to the correct environment variables and configuration files for each instance.
- Start each instance by running the appropriate startup script for each instance.
- To access the different instances, you can use different IP addresses or hostnames, or different ports on the same IP address or hostname.
Note: The above steps are for Linux and Unix-like systems, for Windows you need to adjust the script names accordingly.
Let’s 1st understand Tomcat Directory Structure..
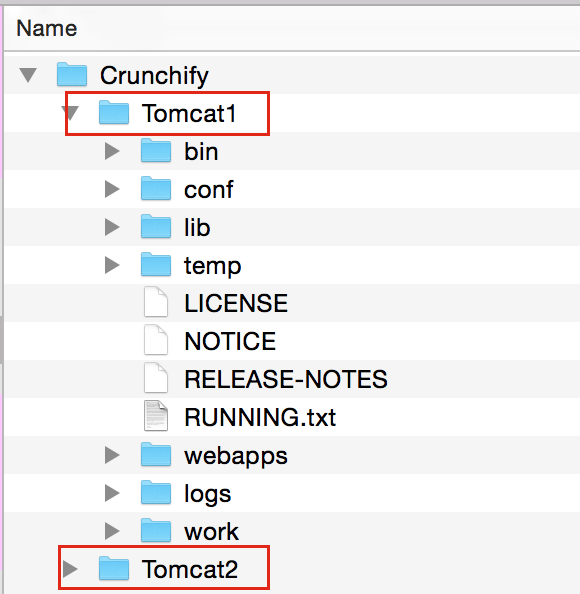
When creating multiple instances of tomcat server, we need to play with the folders inside the server. These folders contain the actual scripts and code for the server. We have the option to either use the code base for tomcat in shared mode where all tomcat instances refer to the same physical code or we can create separate copies of these folder for each tomcat instance.
/bin :This directory contains the startup and shutdown scripts for both Windows and Linux./conf :This directory contains the main configuration files for Tomcat. The two most important are the server.xml and the global web.xml ./server :This directory contains the Tomcat Java Archive files./lib :This directory contains Java Archive files that Tomcat is dependent upon./logs :This directory contains Tomcat’s log files./src :This directory contains the source code used by the Tomcat server. Once Tomcat is released, it will probably contain interfaces and abstract classes only./webapps :All web applications are deployed in this directory; it contains the WAR file./work :This is the directory in which Tomcat will place all servlets that are generated from JSPs. If you want to see exactly how a particular JSP is interpreted, look in this directory.
Tomcat server ports
Having a good understanding of tomcat ports is essential to manage the multiple instances of the same server installation. These ports are used by tomcat for start-up, deployment and shut-down operations.
The detail of each port is as:
Connector Port: This is the port where Apache Tomcat listen for the HTTP requests.Shutdown Port: This port is used when we try to shutdown the Apache Tomcat Server.AJP (Apache JServ Protocol) Connector Port: The Apache JServ Protocol (AJP) is a binary protocol that can conduct inbound requests from a web server through to an application server that sits behind the web server.Redirect Port: Any redirection happening inside Apache Tomcat will happen through this port. In Apache TOMCAT there are two instance where redirect Port is mentioned. First one is for the Apache TOMCAT server and other one is for the AJP port.
Other must read:
- How to Start Stop Apache Tomcat Server via Command Line?
- How to Run Java Program Automatically on Tomcat Startup
Lets start creating multiple Tomcat Instances in Mac environment..
Step-1
Download and Copy Tomcat Instances under ~/Documents/Crunchify/ folder.

Step-2
Change below HTTP, HTTPS, AJP, Shutdown Ports for Tomcat2 instance.
File location: Tomcat2/conf/server.xml file.


Step-3
The startup.sh and shutdown.sh script files make use of catalina.sh for performing the startup and shutdown operations. We shall edit catalina.sh file as described below:
a)
For tomcat1, specify following two variables in catalina.sh script file present in the bin folder of the tomcat_home
export CATALINA_HOME= /Users/<username>/Documents/Crunchify/Tomcat1
export CATALINA_BASE= /Users/<username>/Documents/Crunchify/Tomcat1
b)
For tomcat2, specify following two variables in catalina.sh script file present in the bin folder of the tomcat_home
export CATALINA_HOME= /Users/<username>/Documents/Crunchify/Tomcat2
export CATALINA_BASE= /Users/<username>/Documents/Crunchify/Tomcat2
Step-4
Startup scripts are a whole other topic, but here’s the brief rundown. The main different from running a single Tomcat instance is you need to set CATALINA_BASE to the directory you set up for the particular instance you want to start (or stop).
Here’s a typical startup routine. Just create crunchify.sh script and run it using ./crunchify.sh
JAVA_HOME=/usr/java
JAVA_OPTS="-Xmx1024m -Xms300m"
export JAVA_HOME JAVA_OPTS CATALINA_HOME CATALINA_BASE

$CATALINA_HOME/bin/catalina.sh start

