In this current innovative technology world, there is no place you don’t need Database connectivity to perform personalize connection and activity.
If you are using Facebook, Twitter or any other social media, every action you perform on site might be stored into DB and which will be retrieved during your next visit for relevant personalize view.
There are quite a few other techniques like browser caching but storing preference to DataBase is one of them.
There are so many Databases in wild. Here are few of them: CouchBase, MySQL, Oracle, Cassandra, MongoDB, etc. In this tutorial we will go over MySQL Database.
If you have any of below questions then you are at right place:
- JDBC Tutorial – JDBC HelloWorld MySQL
- Connect to Database using JDBC
- JDBC and MySQL Connectivity
- In Java How to Connect to MySQL with JDBC driver
- Using JDBC to connect to MySQL from Java Program
- Sample code for JDBC connection in java with mysql
- How to connect mysql database in java using eclipse
What you need?
You need to have MySQL installed locally on your desktop or laptop. I’ve installed MAMP on my macOS which by default comes with MySQL DB.
Let’s get started:
- Create class
CrunchifyMySQLDBTutorial.java - Create standard DB
Connection,PreparedStatementandResultSetObjects - Perform
executeUpdate()operation to insert data into Table - Perform
executeQuery()operation to retrieve data from MySQL Table - In our case:
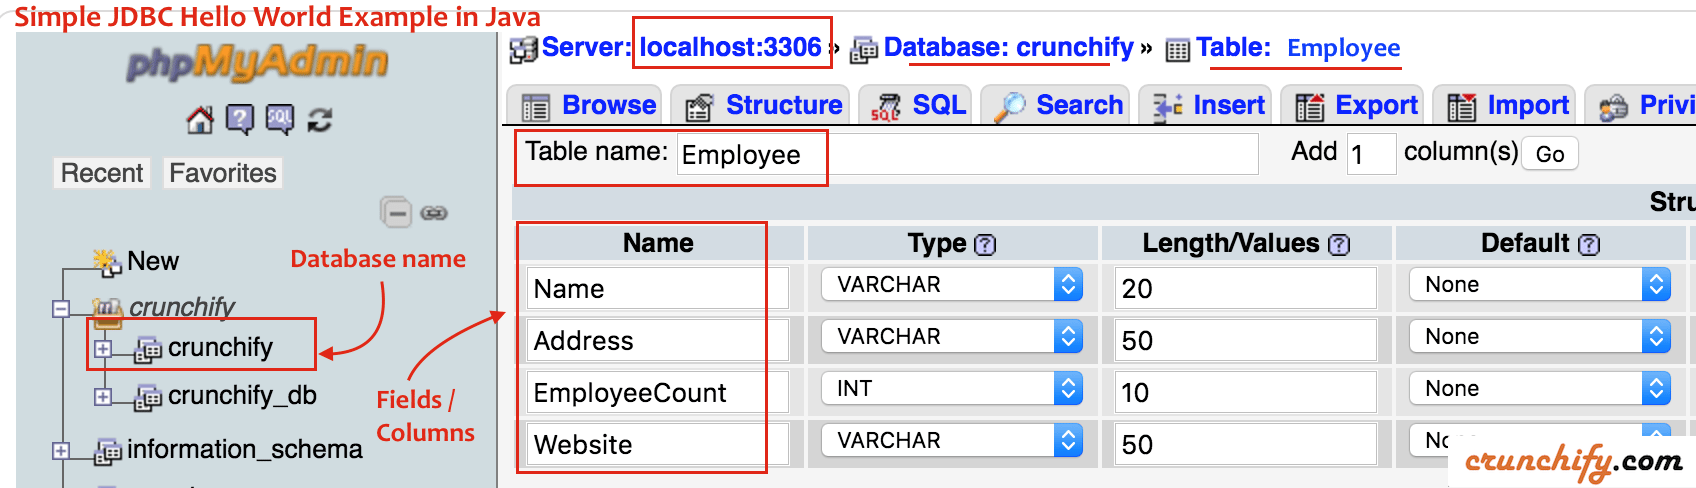
- Database Name: crunchify
- Username: root
- Password: root
- Table Name: employee
Step - 1: Create connection to DB. In case of JDBC failure, we will throw an error messageStep - 2: We will add 3 records to DatabaseStep - 3: We will read all records one by one and print it on Eclipse Console
Maven Dependency for JDBC MySQL
Please add below maven dependency to your project’s pom.xml file.
<dependency>
	<groupId>mysql</groupId>
	<artifactId>mysql-connector-java</artifactId>
	<version>5.1.6</version>
</dependency>
Here is our Database Structure
Complete Java Code for MySQL JDBC connectivity and add, retrieve operation
package crunchify.com.tutorial;
import java.sql.Connection;
import java.sql.DriverManager;
import java.sql.PreparedStatement;
import java.sql.ResultSet;
import java.sql.SQLException;
/**
* @author Crunchify.com
* Simple Hello World MySQL Tutorial on how to make JDBC connection, Add and Retrieve Data by App Shah
*
*/
public class CrunchifyMySQLDBTutorial {
static Connection crunchifyConn = null;
static PreparedStatement crunchifyPrepareStat = null;
public static void main(String[] argv) {
try {
log("-------- Simple Crunchify Tutorial on how to make JDBC connection to MySQL DB locally on macOS ------------");
makeJDBCConnection();
log("\n---------- Adding company 'Crunchify LLC' to DB ----------");
addDataToDB("Crunchify, LLC.", "NYC, US", 5, "https://crunchify.com");
addDataToDB("Google Inc.", "Mountain View, CA, US", 50000, "https://google.com");
addDataToDB("Apple Inc.", "Cupertino, CA, US", 30000, "http://apple.com");
log("\n---------- Let's get Data from DB ----------");
getDataFromDB();
crunchifyPrepareStat.close();
crunchifyConn.close(); // connection close
} catch (SQLException e) {
e.printStackTrace();
}
}
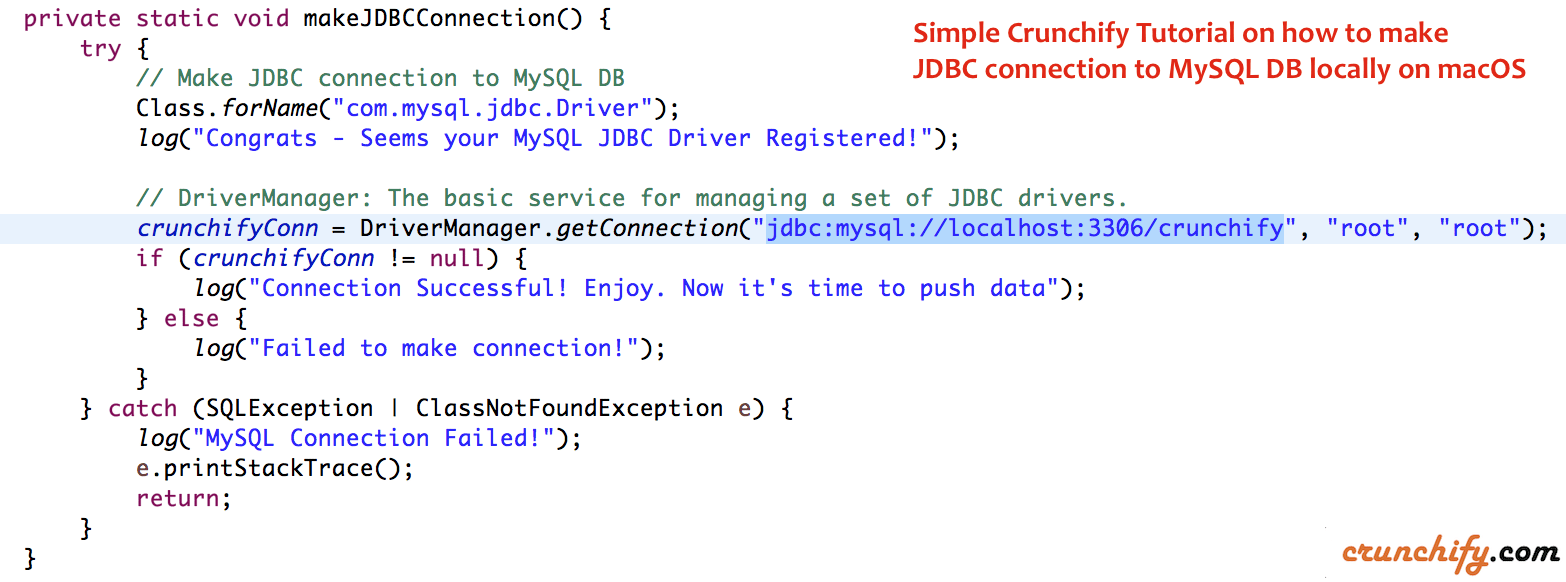
private static void makeJDBCConnection() {
try {
Class.forName("com.mysql.jdbc.Driver");
log("Congrats - Seems your MySQL JDBC Driver Registered!");
} catch (ClassNotFoundException e) {
log("Sorry, couldn't found JDBC driver. Make sure you have added JDBC Maven Dependency Correctly");
e.printStackTrace();
return;
}
try {
// DriverManager: The basic service for managing a set of JDBC drivers.
crunchifyConn = DriverManager.getConnection("jdbc:mysql://localhost:3306/crunchify", "root", "root");
if (crunchifyConn != null) {
log("Connection Successful! Enjoy. Now it's time to push data");
} else {
log("Failed to make connection!");
}
} catch (SQLException e) {
log("MySQL Connection Failed!");
e.printStackTrace();
return;
}
}
private static void addDataToDB(String companyName, String address, int totalEmployee, String webSite) {
try {
String insertQueryStatement = "INSERT INTO Employee VALUES (?,?,?,?)";
crunchifyPrepareStat = crunchifyConn.prepareStatement(insertQueryStatement);
crunchifyPrepareStat.setString(1, companyName);
crunchifyPrepareStat.setString(2, address);
crunchifyPrepareStat.setInt(3, totalEmployee);
crunchifyPrepareStat.setString(4, webSite);
// execute insert SQL statement
crunchifyPrepareStat.executeUpdate();
log(companyName + " added successfully");
} catch (
SQLException e) {
e.printStackTrace();
}
}
private static void getDataFromDB() {
try {
// MySQL Select Query Tutorial
String getQueryStatement = "SELECT * FROM employee";
crunchifyPrepareStat = crunchifyConn.prepareStatement(getQueryStatement);
// Execute the Query, and get a java ResultSet
ResultSet rs = crunchifyPrepareStat.executeQuery();
// Let's iterate through the java ResultSet
while (rs.next()) {
String name = rs.getString("Name");
String address = rs.getString("Address");
int employeeCount = rs.getInt("EmployeeCount");
String website = rs.getString("Website");
// Simply Print the results
System.out.format("%s, %s, %s, %s\n", name, address, employeeCount, website);
}
} catch (
SQLException e) {
e.printStackTrace();
}
}
// Simple log utility
private static void log(String string) {
System.out.println(string);
}
}
Output:
-------- Simple Crunchify Tutorial on how to make JDBC connection to MySQL DB locally on macOS ------------

Congrats - Seems your MySQL JDBC Driver Registered!
Connection Successful! Enjoy. Now it's time to push data

---------- Adding company 'Crunchify LLC' to DB ----------
Crunchify, LLC. added successfully
Google Inc. added successfully
Apple Inc. added successfully

---------- Let's get Data from DB ----------
Crunchify, LLC., NYC, US, 5, https://crunchify.com
Google Inc., Mountain View, CA, US, 50000, https://google.com
Apple Inc., Cupertino, CA, US, 30000, http://apple.com