Declaring a bean
In Spring MVC framework, to declare a bean, simply annotate a method with the @Bean annotation. When JavaConfig encounters such a method, it will execute that method and register the return value as a bean within a BeanFactory. By default, the bean name will be that of the method name
This example will show you how to declare a bean in the Spring container.
Step-1
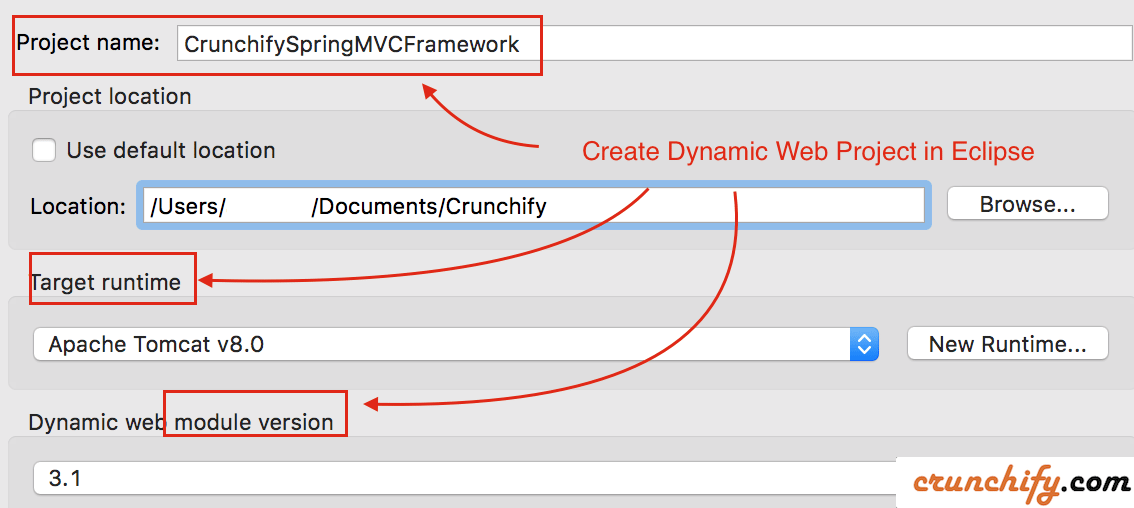
Create new Dynamic Web Project CrunchifySpringMVCFramework in Eclipse.
- Click on
File->New->Dynamic Web Project
Step-2
Convert project to Maven project.
Right click on project -> Click on Configure -> Click on Convert Project to Maven Project.
Step-3
Open pom.xml file and add below SpringMVC 4.2.2 Maven Dependencies before <build> tag.
<dependencies>
    <dependency>
        <groupId>org.springframework</groupId>
        <artifactId>spring-context</artifactId>
        <version>4.2.2.RELEASE</version>
    </dependency>
</dependencies>
Step-4
Create new resources folder.
- Click on Java Resources -> New -> Source Folder
- Provide name
resources
Step-5
Create Spring configuration, which is a HelloCrunchify.xml file under /resources folder. The bean declared using the bean element in the configuration file. At minimum the declaration contains the bean’s id and it’s class.
<?xml version="1.0" encoding="UTF-8"?>
<beans xmlns="http://www.springframework.org/schema/beans"
    xmlns:xsi="http://www.w3.org/2001/XMLSchema-instance" xmlns:p="http://www.springframework.org/schema/p"
    xmlns:context="http://www.springframework.org/schema/context"
    xsi:schemaLocation="http://www.springframework.org/schema/beans
http://www.springframework.org/schema/beans/spring-beans-3.0.xsd
http://www.springframework.org/schema/context
http://www.springframework.org/schema/context/spring-context-3.0.xsd">

    <bean id="helloCrunchify" class="com.crunchify.spring.impl.HelloCrunchifyImpl" />
</beans>
Step-6
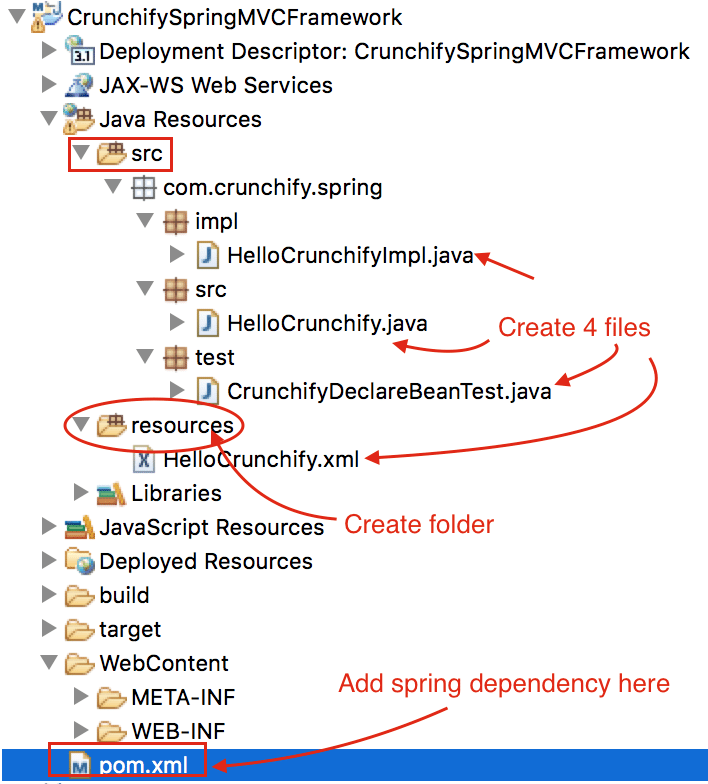
We will create new three .java files:
- HelloCrunchify.java under
/srcfolder - HelloCrunchifyImpl.java
/srcfolder - CrunchifyDeclareBeanTest.java under
/srcfolder
Create a simple bean called HelloCrunchifyImpl.java with a method called sayHelloCrunchify(). That’s all we need for our bean.
Other must read: List of more than 300 Java Tutorials.
package com.crunchify.spring.impl;

import org.springframework.context.annotation.Bean;

import com.crunchify.spring.src.HelloCrunchify;

/**
 * @author Crunchify.com
 */

public class HelloCrunchifyImpl implements HelloCrunchify {
	@Bean
	public void sayHelloCrunchify() {
		System.out.println("\n Spring Hello World Example by Crunchify..!!");
		System.out.println(" Example for: How to declare a bean in Spring application?");
	}
}
package com.crunchify.spring.src;

/**
 * @author Crunchify.com
 */

public interface HelloCrunchify {
    void sayHelloCrunchify();
}
Now we have the bean declared in the Spring container. The next step show you how to get the bean from the container and use it in our program. There are many ways that can be use to load the Spring container. Here we will use the ClassPathXmlApplicationContext.
This CrunchifyDeclareBeanTest.java class load the configuration that found in the runtime classpath.
package com.crunchify.spring.test;

import org.springframework.context.ApplicationContext;
import org.springframework.context.support.ClassPathXmlApplicationContext;

import com.crunchify.spring.src.HelloCrunchify;

/**
 * @author Crunchify.com
 */

public class CrunchifyDeclareBeanTest {
	@SuppressWarnings("resource")
	public static void main(String[] args) {

		ApplicationContext context = new ClassPathXmlApplicationContext("HelloCrunchify.xml");

		HelloCrunchify hello = (HelloCrunchify) context.getBean("helloCrunchify");
		hello.sayHelloCrunchify();
	}
}
Step-8
Make sure you have similar project structure.
Step-9
Right click on CrunchifyDeclareBeanTest.java -> Run As -> Java Application.


