
Hello readers – In this tutorial we will go over list of steps on how to create your 1st very simple Hello World Spring Boot application with just few clicks.
Sometime back I’ve written an article on how to create your first Spring Boot application in Eclipse. Kindly take a look if you want to create it in Eclipse IDE.
Spring boot application usage increased a lot over last few years as it’s super simple to run your application without Apache Tomcat and any other application servers.
In next tutorial we will create simple Spring Boot Web application which listens on port 8081.
Let’s get started.
- We will create 1st web based Spring Boot Application using Spring Initializer site (preferred)
- Then we will create another simple Spring Boot Application from scratch.
Example-1: With Spring Initializer website
This example of a simple Spring Boot application that displays Hello World in a web browser:
Step-1. Create Spring Boot project
Create a new Spring Boot project using the Spring Initializer website (https://start.spring.io/) or your preferred IDE.
Please make sure to select below options:
- Language: Java
- Project: Maven
- Spring Boot: 3.0.2
- Packaging: Jar
- Java: 19 (Please download and install latest java if required)
Project Metadata:
- Group: crunchify.com
- Artifact: spring
- Name: spring
- Description: any description 🙂
- Package name: crunchify.com.spring
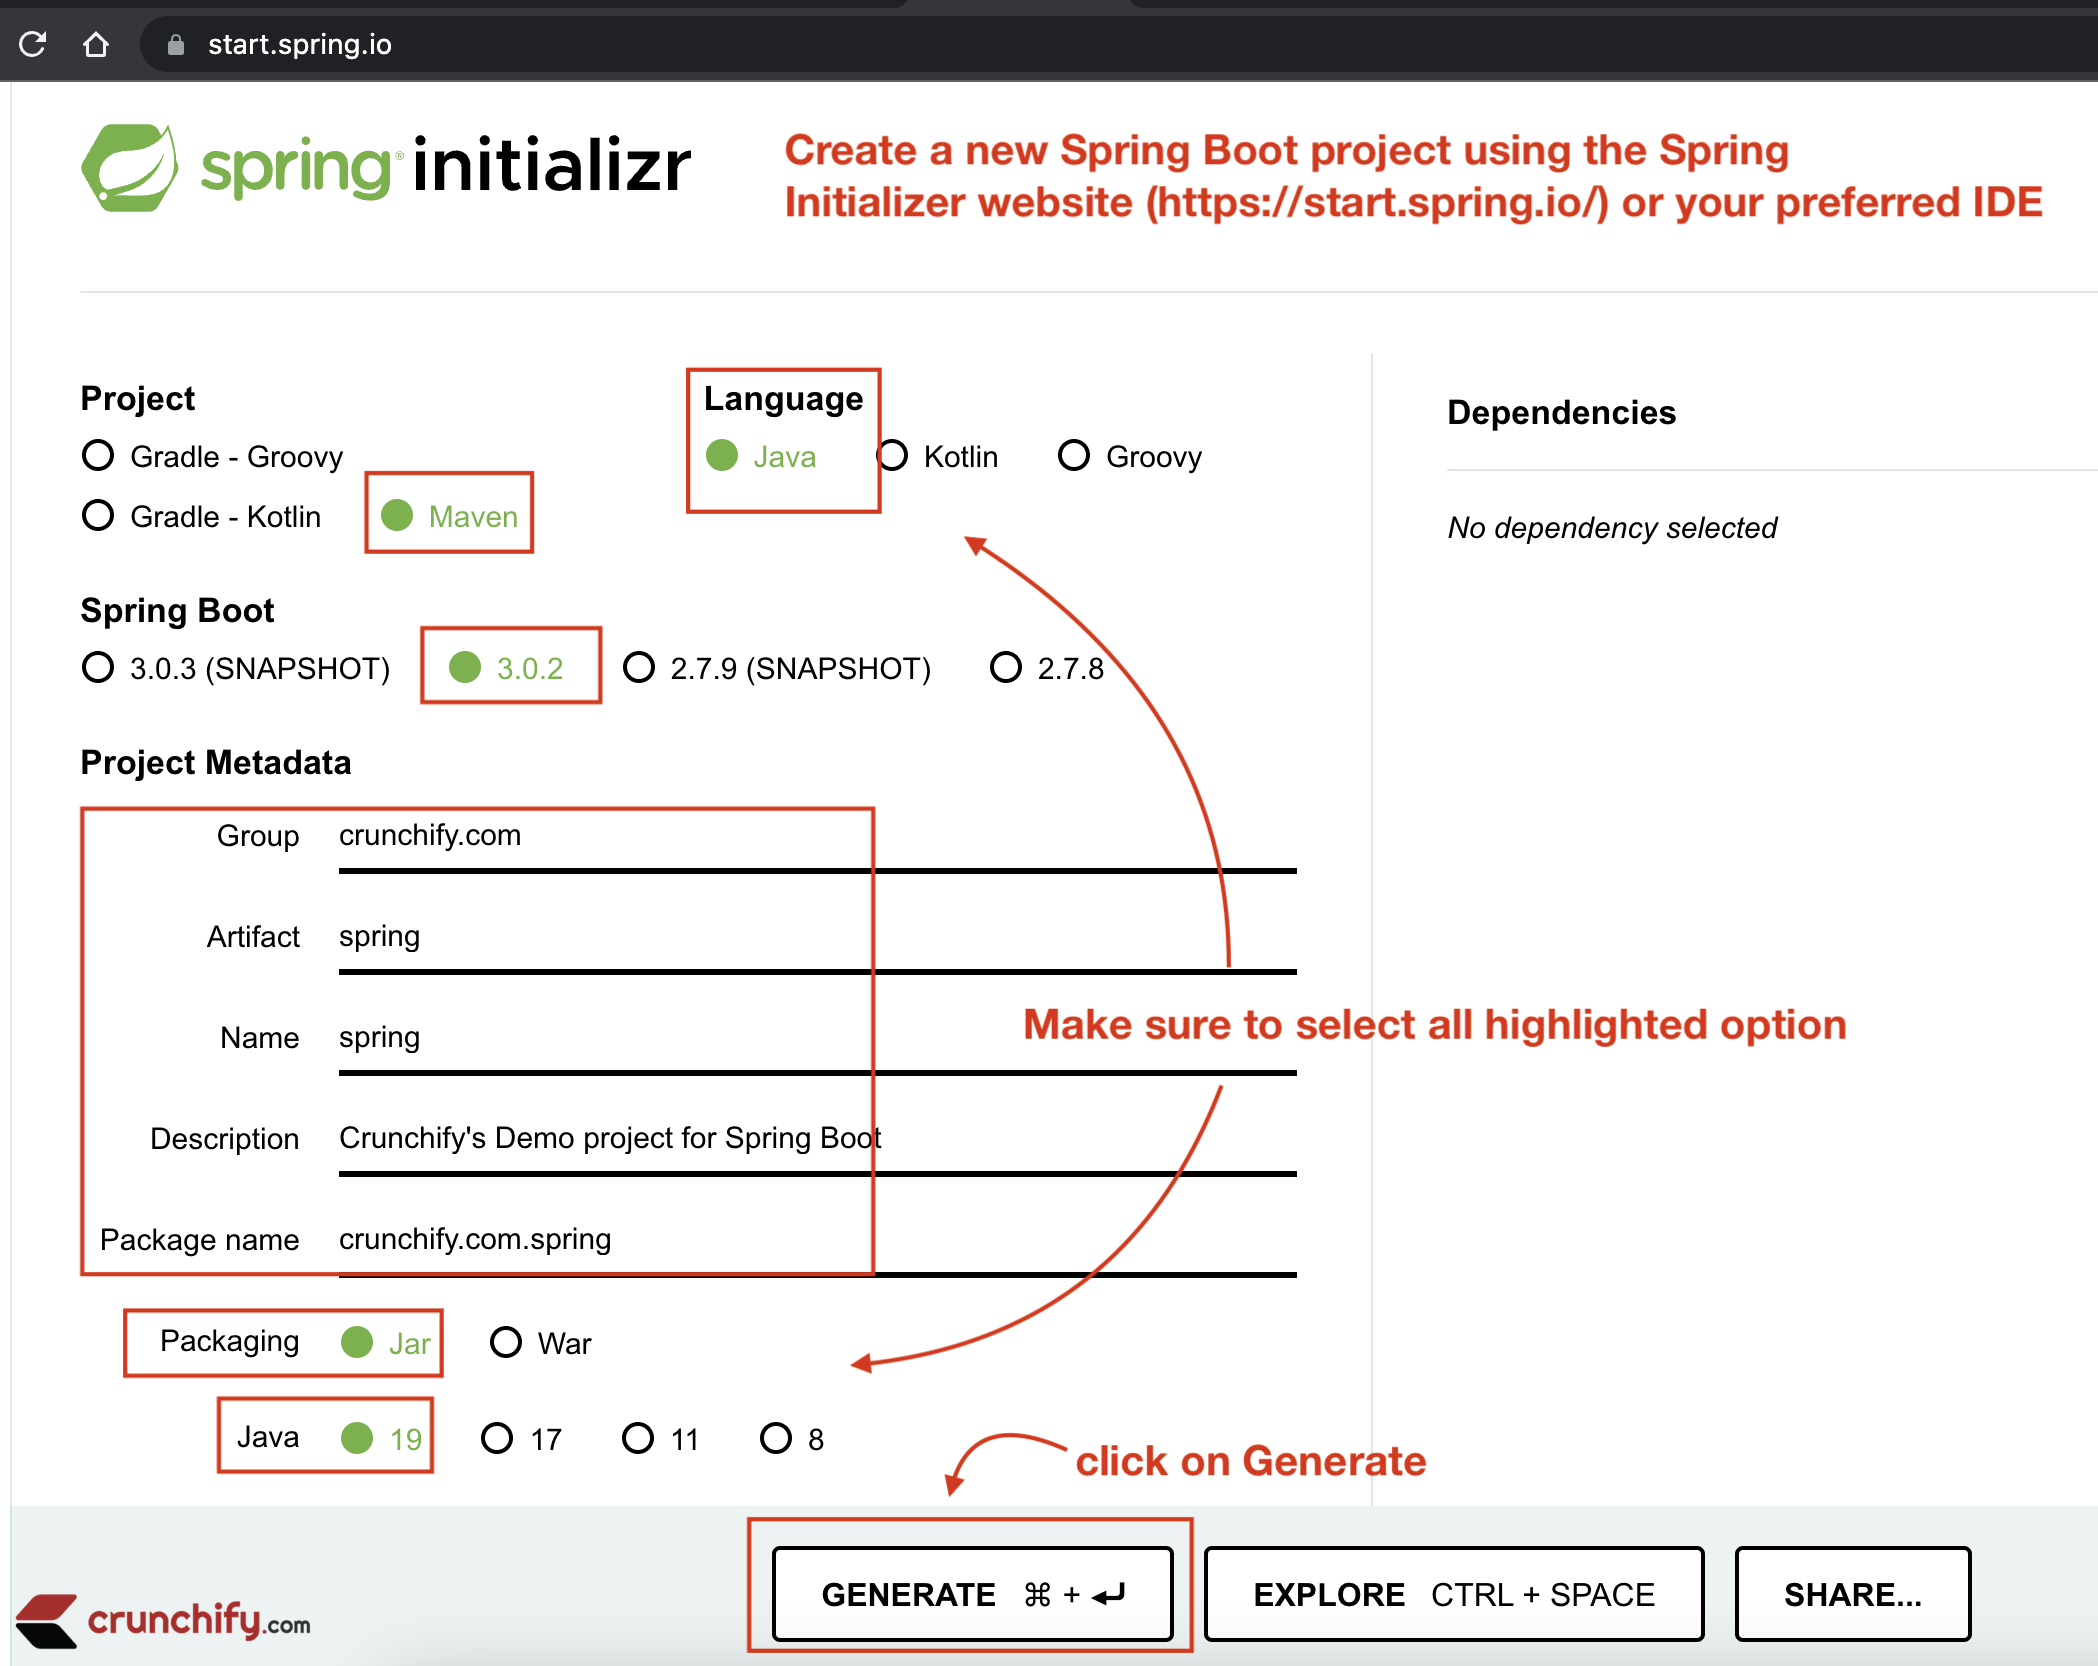
- After generating package, download
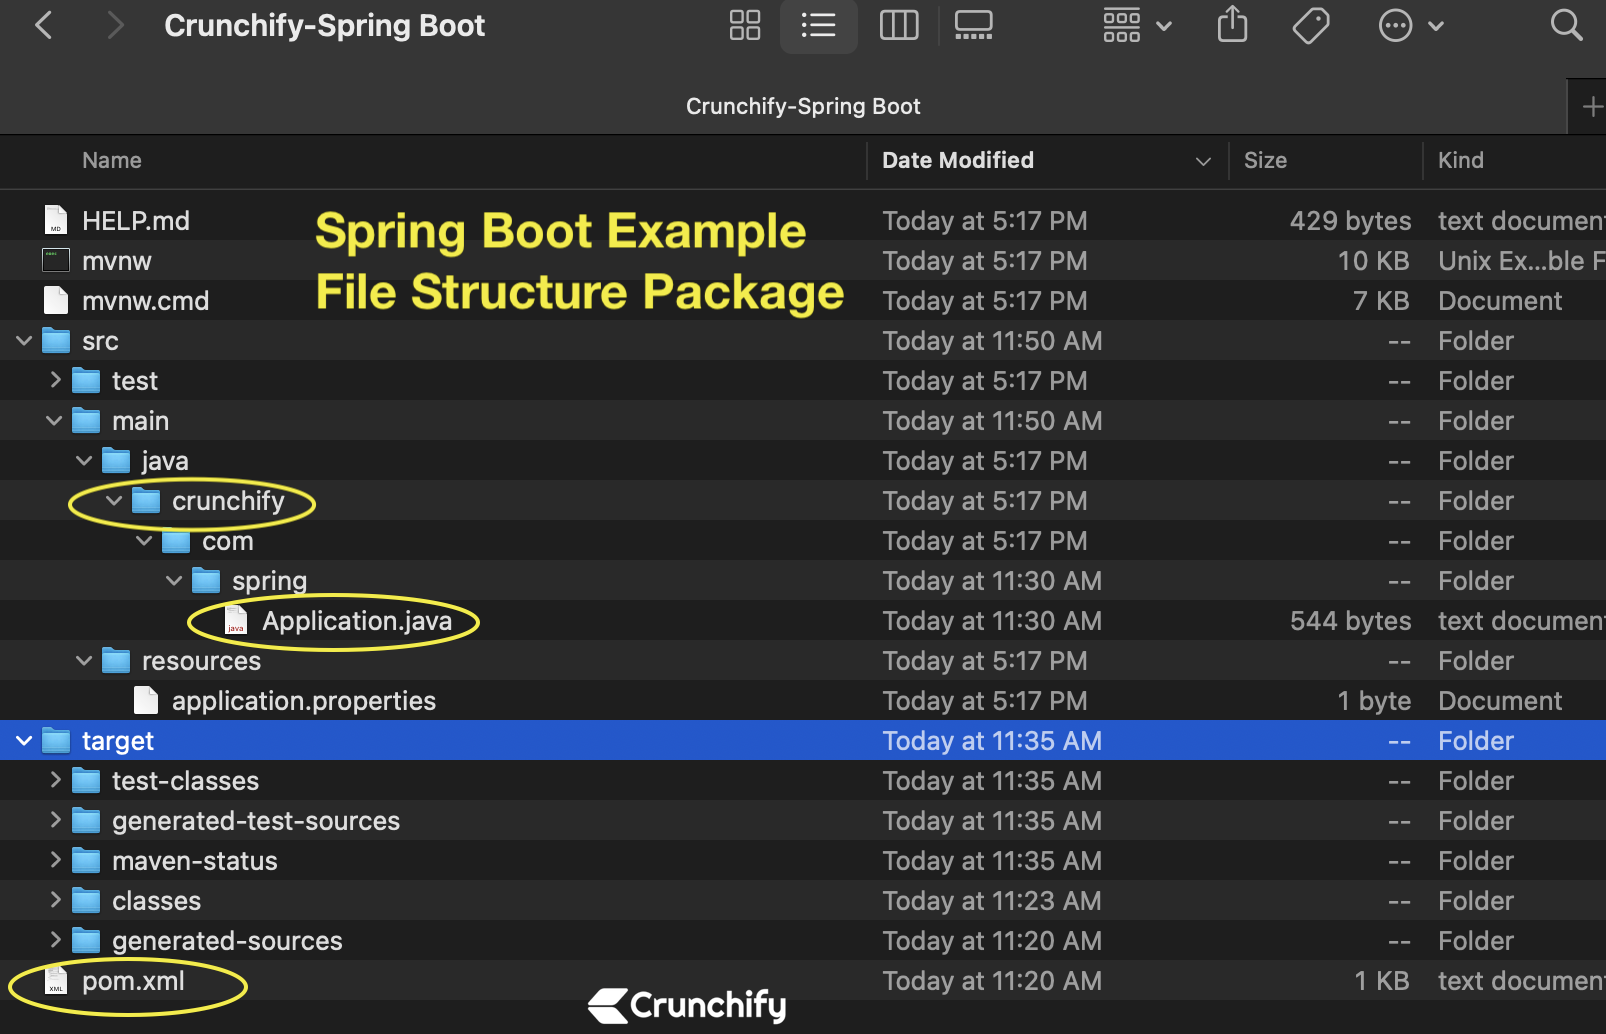
spring.zipfile. - It should have all of below file contents.
- Just import ready to use project into your IDE.
Step-2. Modify Application.java
In the project’s main class (e.g. src/main/java/crunchify/com/spring/Application.java), add the following code to create a simple REST controller:
@GetMapping("/hello")
	public String sayHello() {
		return "Hello World - Example by Crunchify.com";
	}
Your Application.java would look like this.
Application.java
package crunchify.com.spring;

import org.springframework.boot.SpringApplication;
import org.springframework.boot.autoconfigure.SpringBootApplication;
import org.springframework.web.bind.annotation.GetMapping;
import org.springframework.web.bind.annotation.RestController;

@RestController
@SpringBootApplication
public class Application {

	public static void main(String[] args) {
		SpringApplication.run(Application.class, args);
	}

	@GetMapping("/hello")
	public String sayHello() {
		return "Hello World - Example by Crunchify.com";
	}
}
Step-3. Add Maven Dependencies
Make sure you pom.xml file has below 3 dependencies.
	<dependencies>
		<dependency>
			<groupId>org.springframework.boot</groupId>
			<artifactId>spring-boot-starter</artifactId>
		</dependency>

		<dependency>
			<groupId>org.springframework.boot</groupId>
			<artifactId>spring-boot-starter-test</artifactId>
			<scope>test</scope>
		</dependency>
		<dependency>
			<groupId>org.springframework.boot</groupId>
			<artifactId>spring-boot-starter-web</artifactId>
		</dependency>
	</dependencies>
Your full pom.xml would look like this.
<?xml version="1.0" encoding="UTF-8"?> <project xmlns="http://maven.apache.org/POM/4.0.0" xmlns:xsi="http://www.w3.org/2001/XMLSchema-instance" xsi:schemaLocation="http://maven.apache.org/POM/4.0.0 https://maven.apache.org/xsd/maven-4.0.0.xsd"> <modelVersion>4.0.0</modelVersion> <parent> <groupId>org.springframework.boot</groupId> <artifactId>spring-boot-starter-parent</artifactId> <version>3.0.2</version> <relativePath/> <!-- lookup parent from repository --> </parent> <groupId>crunchify.com</groupId> <artifactId>spring</artifactId> <version>0.0.1-SNAPSHOT</version> <name>spring</name> <description>Crunchify's Demo project for Spring Boot</description> <properties> <java.version>19</java.version> </properties> <dependencies> <dependency> <groupId>org.springframework.boot</groupId> <artifactId>spring-boot-starter</artifactId> </dependency> <dependency> <groupId>org.springframework.boot</groupId> <artifactId>spring-boot-starter-test</artifactId> <scope>test</scope> </dependency> <dependency> <groupId>org.springframework.boot</groupId> <artifactId>spring-boot-starter-web</artifactId> </dependency> </dependencies> <build> <plugins> <plugin> <groupId>org.springframework.boot</groupId> <artifactId>spring-boot-maven-plugin</artifactId> </plugin> </plugins> </build> </project>
Step-4. Run
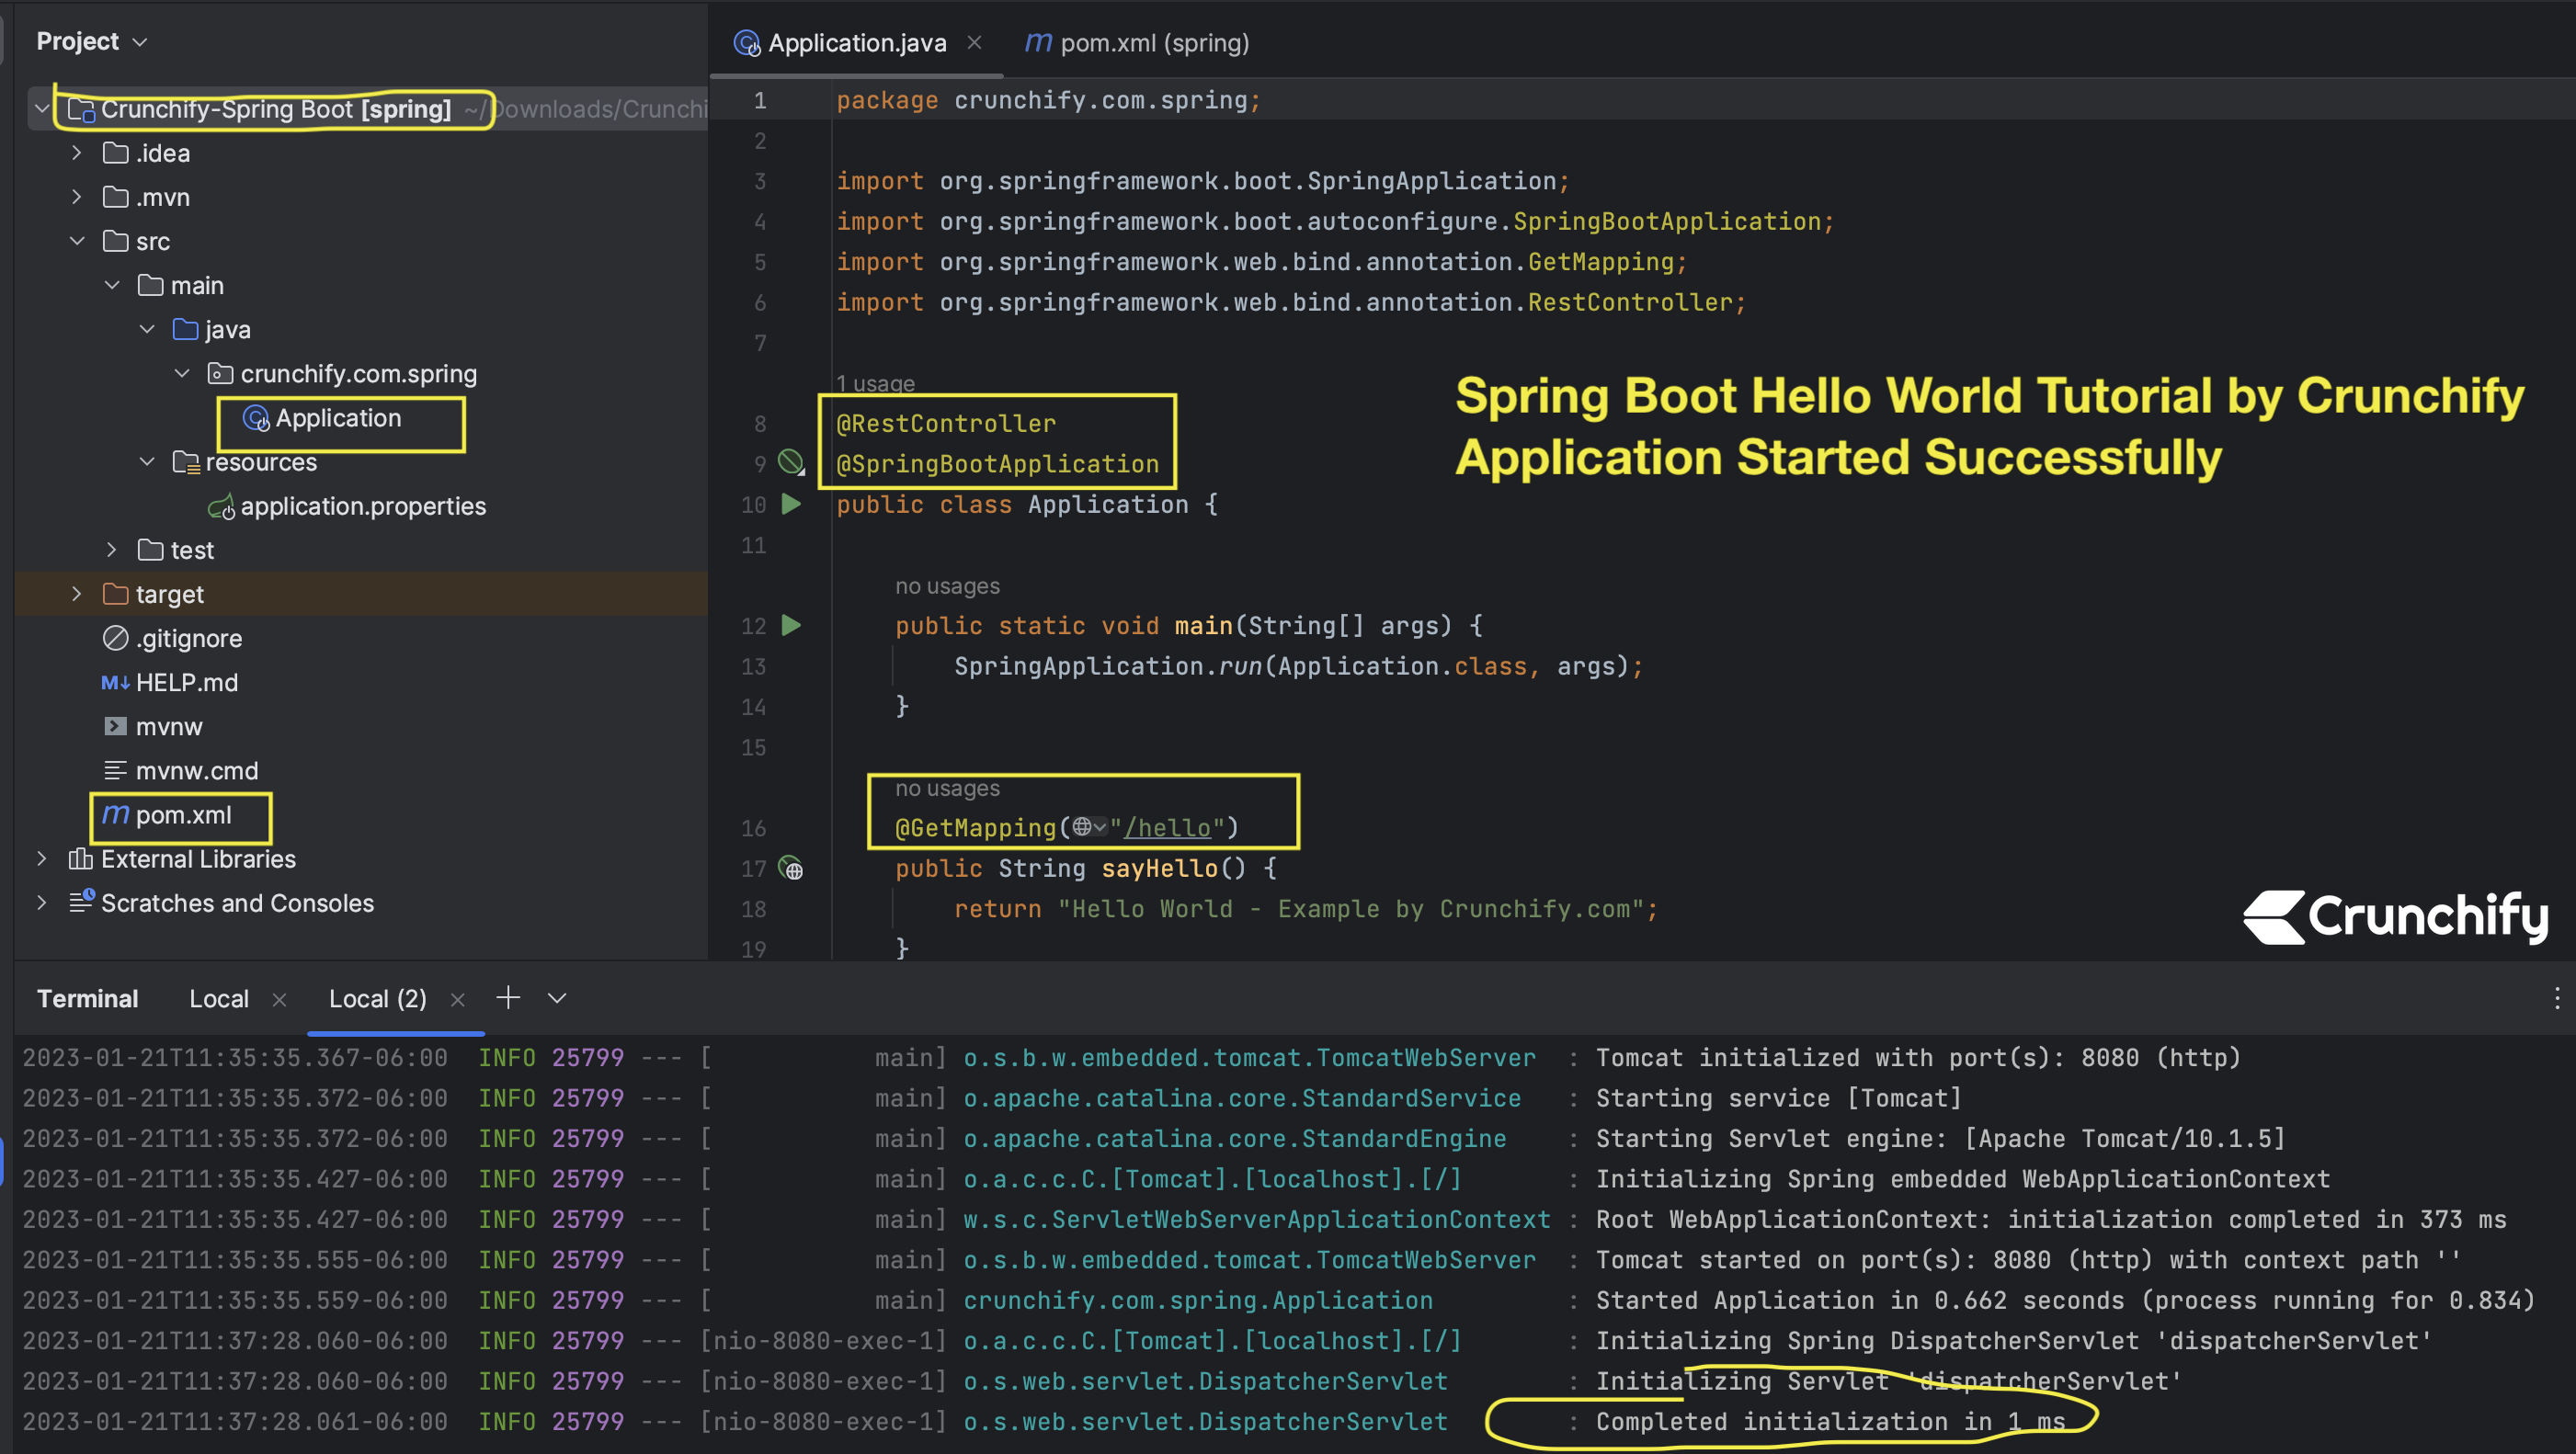
- Right click on Crunchify-Spring Boot [Main project]
- Click on Open In…
- Click on Terminal…
Type below command to run Spring Application
mvn spring-boot:run
appshah@macbookpro Crunchify-Spring Boot % mvn spring-boot:run

[INFO] Scanning for projects...
[INFO]
[INFO] ------------------------< crunchify.com:spring >------------------------
[INFO] Building spring 0.0.1-SNAPSHOT
[INFO] --------------------------------[ jar ]---------------------------------
[INFO]
[INFO] >>> spring-boot-maven-plugin:3.0.2:run (default-cli) > test-compile @ spring >>>
[INFO]
[INFO] --- maven-resources-plugin:3.3.0:resources (default-resources) @ spring ---
[INFO] Copying 1 resource
[INFO] Copying 0 resource
[INFO]
[INFO] --- maven-compiler-plugin:3.10.1:compile (default-compile) @ spring ---
[INFO] Changes detected - recompiling the module!
[INFO] Compiling 1 source file to /Users/appshah/Downloads/Crunchify-Spring Boot/target/classes
[INFO]
[INFO] --- maven-resources-plugin:3.3.0:testResources (default-testResources) @ spring ---
[INFO] skip non existing resourceDirectory /Users/appshah/Downloads/Crunchify-Spring Boot/src/test/resources
[INFO]
[INFO] --- maven-compiler-plugin:3.10.1:testCompile (default-testCompile) @ spring ---
[INFO] Changes detected - recompiling the module!
[INFO] Compiling 1 source file to /Users/appshah/Downloads/Crunchify-Spring Boot/target/test-classes
[INFO]
[INFO] <<< spring-boot-maven-plugin:3.0.2:run (default-cli) < test-compile @ spring <<<
[INFO]
[INFO]
[INFO] --- spring-boot-maven-plugin:3.0.2:run (default-cli) @ spring ---
[INFO] Attaching agents: []

  .   ____          _            __ _ _
 /\\ / ___'_ __ _ _(_)_ __  __ _ \ \ \ \
( ( )\___ | '_ | '_| | '_ \/ _` | \ \ \ \
 \\/  ___)| |_)| | | | | || (_| |  ) ) ) )
  '  |____| .__|_| |_|_| |_\__, | / / / /
 =========|_|==============|___/=/_/_/_/
 :: Spring Boot ::                (v3.0.2)

2023-01-21T11:35:35.033-06:00  INFO 25799 --- [           main] crunchify.com.spring.Application         : Starting Application using Java 19.0.1 with PID 25799 (/Users/appshah/Downloads/Crunchify-Spring Boot/target/classes started by appshah in /Users/appshah/Downloads/Crunchify-Spring Boot)
2023-01-21T11:35:35.034-06:00  INFO 25799 --- [           main] crunchify.com.spring.Application         : No active profile set, falling back to 1 default profile: "default"
2023-01-21T11:35:35.367-06:00  INFO 25799 --- [           main] o.s.b.w.embedded.tomcat.TomcatWebServer  : Tomcat initialized with port(s): 8080 (http)
2023-01-21T11:35:35.372-06:00  INFO 25799 --- [           main] o.apache.catalina.core.StandardService   : Starting service [Tomcat]
2023-01-21T11:35:35.372-06:00  INFO 25799 --- [           main] o.apache.catalina.core.StandardEngine    : Starting Servlet engine: [Apache Tomcat/10.1.5]
2023-01-21T11:35:35.427-06:00  INFO 25799 --- [           main] o.a.c.c.C.[Tomcat].[localhost].[/]       : Initializing Spring embedded WebApplicationContext
2023-01-21T11:35:35.427-06:00  INFO 25799 --- [           main] w.s.c.ServletWebServerApplicationContext : Root WebApplicationContext: initialization completed in 373 ms
2023-01-21T11:35:35.555-06:00  INFO 25799 --- [           main] o.s.b.w.embedded.tomcat.TomcatWebServer  : Tomcat started on port(s): 8080 (http) with context path ''
2023-01-21T11:35:35.559-06:00  INFO 25799 --- [           main] crunchify.com.spring.Application         : Started Application in 0.662 seconds (process running for 0.834)
Step-5. Testing
- Open Chrome or Safari Browser.
- Type URL:
http://localhost:8080/helloand you should see result as below.

And you are all set. Let me know if you face any issue running your 1st Spring Boot Application.
Example-2: From scratch without Spring Initializer website
Another way of creating Spring Boot Application. But I like Example-1.
Step-1.
- Open IntelliJ IDEA
- Click on File
- Click on New
- Click on Project

Step-2.
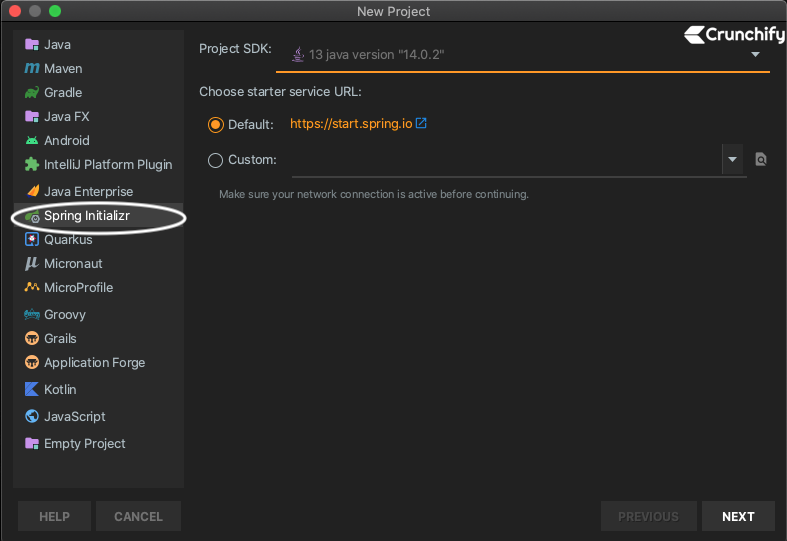
- IntelliJ IDEA – Create Spring Boot application with
Spring Initializr - Click Next
Step-3.
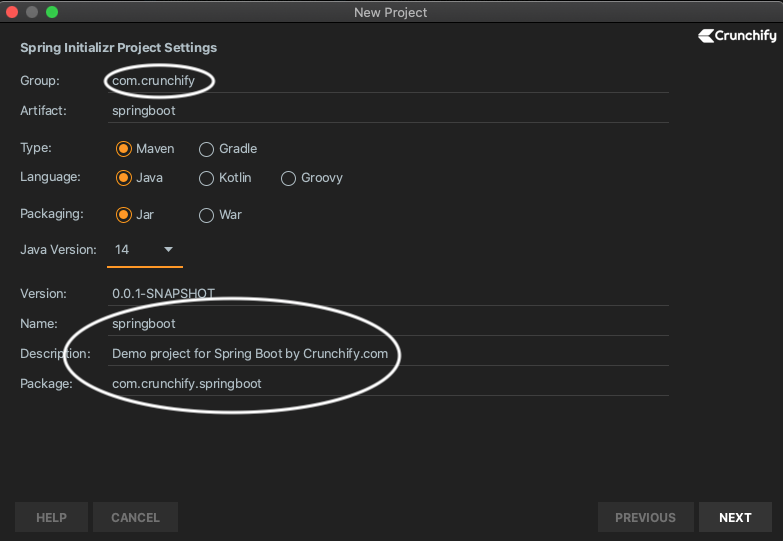
- Provide Project details as below
- Group:
com.crunchify - Artifact: springboot
- package:
com.crunchify.springboot - Java Version: 13 or 14 (your installed JDK binary)
- Click Next
Step-4.
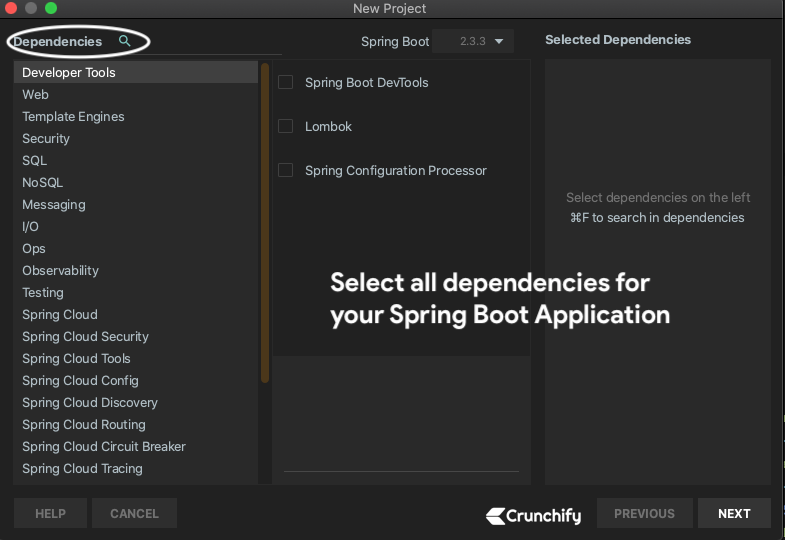
- Select all dependencies for your Spring Boot Application
- I haven’t selected any dependencies for this project
- Click Next
Step-5.
- This will create new Spring Boot Application in your IntelliJ IDEA.
- Open file: SrpingBootApplication.java
- Modify it to print some info messages
Copy and paste below content to it.
package com.crunchify.springboot;

import org.springframework.boot.SpringApplication;
import org.springframework.boot.autoconfigure.SpringBootApplication;

/**
 * @author Crunchify.com
 * 1st Spring Hello World Application in Intellij IDEA by Crunchify.com
 * Version: 1.0
 */

@SpringBootApplication
public class SpringbootApplication {

    public static void main(String[] args) {
        SpringApplication.run(SpringbootApplication.class, args);
        System.out.println("\n Hello. This is 1st Spring Hello World Application in Intellij IDEA by Crunchify.com");
    }
}
Step-6. Build a project
- Right click on project springboot from left panel
- Click on build module ‘springboot’
You should see successful build message as below.
Clearing build system data...
Executing pre-compile tasks...
Loading Ant Configuration...
Running Ant Tasks...
Cleaning output directories...
Running 'before' tasks
Checking sources
Copying resources... [springboot]
Parsing java... [springboot]
Writing classes... [springboot]
Updating dependency information... [springboot]
Adding @NotNull assertions... [springboot]
Adding pattern assertions... [springboot]
Parsing java... [tests of springboot]
Writing classes... [tests of springboot]
Updating dependency information... [tests of springboot]
Adding @NotNull assertions... [tests of springboot]
Adding pattern assertions... [tests of springboot]
Running 'after' tasks
javac 14.0.2 was used to compile java sources
Finished, saving caches...
Executing post-compile tasks...
Loading Ant Configuration...
Running Ant Tasks...
Synchronizing output directories...
8/17/20, 12:11 PM - Build completed successfully in 2 s 236 ms
Step-7. Run a Java program
- Right click on java file SpringbootApplication and run
- You should see successful result
/Library/Java/JavaVirtualMachines/jdk-14.0.2.jdk/Contents/Home/bin/java -XX:TieredStopAtLevel=1 -noverify -Dspring.output.ansi.enabled=always -Dcom.sun.management.jmxremote -Dspring.jmx.enabled=true -Dspring.liveBeansView.mbeanDomain -Dspring.application.admin.enabled=true
-javaagent:/Applications/IntelliJ IDEA.app/Contents/lib/idea_rt.jar=53480:/Applications/IntelliJ IDEA.app/Contents/bin -Dfile.encoding=UTF-8 -classpath /Users/appshah/crunchify/intellij/springboot/target/classes:/Users/appshah/.m2/repository/org/springframework/boot/spring-boot-starter/2.3.3.RELEASE/spring-boot-starter-2.3.3.RELEASE.jar
:/Users/appshah/.m2/repository/org/springframework/boot/spring-boot/2.3.3.RELEASE/spring-boot-2.3.3.RELEASE.jar:/Users/appshah/.m2/repository/org/springframework/spring-context/5.2.8.RELEASE/spring-context-5.2.8.RELEASE.jar:/Users/appshah/.m2/repository/org/springframework/spring-aop/5.2.8.RELEASE/spring-aop-5.2.8.RELEASE.jar:/Users/appshah/.m2/repository/org/springframework/spring-beans/5.2.8.RELEASE/spring-beans-5.2.8.RELEASE.jar
:/Users/appshah/.m2/repository/org/springframework/spring-expression/5.2.8.RELEASE/spring-expression-5.2.8.RELEASE.jar:/Users/appshah/.m2/repository/org/springframework/boot/spring-boot-autoconfigure/2.3.3.RELEASE/spring-boot-autoconfigure-2.3.3.RELEASE.jar:/Users/appshah/.m2/repository/org/springframework/boot/spring-boot-starter-logging/2.3.3.RELEASE/spring-boot-starter-logging-2.3.3.RELEASE.jar
:/Users/appshah/.m2/repository/ch/qos/logback/logback-classic/1.2.3/logback-classic-1.2.3.jar:/Users/appshah/.m2/repository/ch/qos/logback/logback-core/1.2.3/logback-core-1.2.3.jar:/Users/appshah/.m2/repository/org/apache/logging/log4j/log4j-to-slf4j/2.13.3/log4j-to-slf4j-2.13.3.jar:/Users/appshah/.m2/repository/org/apache/logging/log4j/log4j-api/2.13.3/log4j-api-2.13.3.jar
:/Users/appshah/.m2/repository/org/slf4j/jul-to-slf4j/1.7.30/jul-to-slf4j-1.7.30.jar:/Users/appshah/.m2/repository/jakarta/annotation/jakarta.annotation-api/1.3.5/jakarta.annotation-api-1.3.5.jar:/Users/appshah/.m2/repository/org/springframework/spring-core/5.2.8.RELEASE/spring-core-5.2.8.RELEASE.jar:/Users/appshah/.m2/repository/org/springframework/spring-jcl/5.2.8.RELEASE/spring-jcl-5.2.8.RELEASE.jar
:/Users/appshah/.m2/repository/org/yaml/snakeyaml/1.26/snakeyaml-1.26.jar
:/Users/appshah/.m2/repository/org/slf4j/slf4j-api/1.7.30/slf4j-api-1.7.30.jar com.crunchify.springboot.SpringbootApplication

Java HotSpot(TM) 64-Bit Server VM warning: Options -Xverify:none and -noverify were deprecated in JDK 13 and will likely be removed in a future release.

  .   ____          _            __ _ _
 /\\ / ___'_ __ _ _(_)_ __  __ _ \ \ \ \
( ( )\___ | '_ | '_| | '_ \/ _` | \ \ \ \
 \\/  ___)| |_)| | | | | || (_| |  ) ) ) )
  '  |____| .__|_| |_|_| |_\__, | / / / /
 =========|_|==============|___/=/_/_/_/
 :: Spring Boot ::        (v2.3.3.RELEASE)

2020-08-17 12:12:29.554  INFO 70969 --- [           main] c.c.springboot.SpringbootApplication     : Starting SpringbootApplication on LM-AUN-11022307 with PID 70969 (/Users/appshah/crunchify/intellij/springboot/target/classes started by appshah in /Users/appshah/crunchify/intellij/springboot)
2020-08-17 12:12:29.556  INFO 70969 --- [           main] c.c.springboot.SpringbootApplication     : No active profile set, falling back to default profiles: default
2020-08-17 12:12:29.772  INFO 70969 --- [           main] c.c.springboot.SpringbootApplication     : Started SpringbootApplication in 0.385 seconds (JVM running for 0.728)

 Hello. This is 1st Spring Hello World Application in Intellij IDEA by Crunchify.com

Process finished with exit code 0
Congratulation. You have successfully created Spring Boot application.

