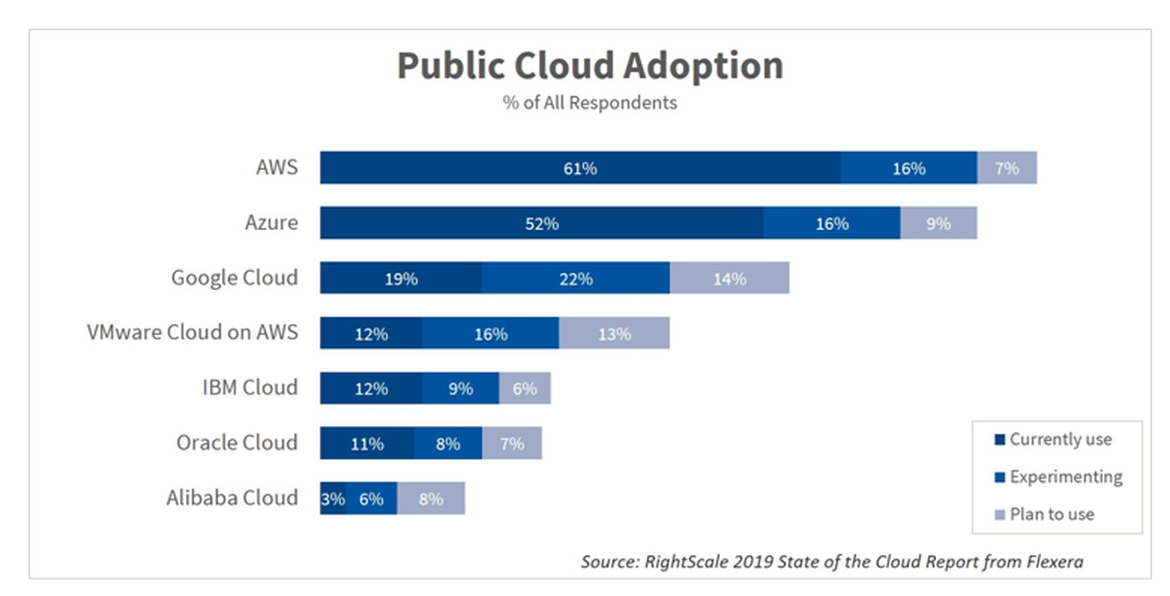
There is no doubt Amazon AWS is the biggest public cloud provider out there. I personally started playing with Amazon AWS for few of Crunchify’s clients and I must say AWS is so flexible.
I use my Macbook Pro for all of my development activities. If you decide to use Amazon AWS cloud for your project then first thing you need is to install Amazon CLI (Command Line Interface) to start automating your basic Amazon AWS operations.

In this tutorial we will go over steps to install Amazon CLI on macOS.
If you have any of below questions then you are at right place:
- Install amazon AWS cli on mac
- Getting started with the AWS CLI – AWS Command Line Interface
- Install, Update, and Uninstall the AWS CLI version 1 or 2 on macOS
- AWS Command Line Interface – Amazon AWS
- How install AWS CLI on Macbook Pro?
- macOS install Amazon AWS command-line interface (CLI) tool
Let’s get started:
There are two ways we could setup Amazon AWS CLI on MacOS.
Option-1: Using curl command

Download Amazon AWS CLI Version 2
bash-3.2$ $ curl "https://awscli.amazonaws.com/AWSCLIV2.pkg" -o "AWSCLIV2.pkg"
Here is a detailed log:
bash-3.2$ $ curl "https://awscli.amazonaws.com/AWSCLIV2.pkg" -o "AWSCLIV2.pkg"
bash: $: command not found
bash-3.2$ curl "https://awscli.amazonaws.com/AWSCLIV2.pkg" -o "AWSCLIV2.pkg"
  % Total    % Received % Xferd  Average Speed   Time    Time     Time  Current
                                 Dload  Upload   Total   Spent    Left  Speed
100 26.2M  100 26.2M    0     0  15.9M      0  0:00:01  0:00:01 --:--:-- 16.0M
Here is a command to install it under folder /
bash-3.2$ sudo installer -pkg AWSCLIV2.pkg -target /
Password:

installer: Package name is AWS Command Line Interface
installer: Installing at base path /
installer: The install was successful.
Verify Amazon AWS version:
bash-3.2$ aws --version
aws-cli/2.4.16 Python/3.8.8 Darwin/21.4.0 exe/x86_64 prompt/off
This is the simplest way to install Amazon AWS CLI on MacOS. Let me know if you face any issue installing it.
Option-2: Using Python pip command
Step-1.
Check you have python installed on your system.
bash-3.2$ python --version
Python 3.7.2
If you don’t see latest version of Python then just install using below command:
bash-3.2$ brew install python
Step-2.
Download latest Amazon AWS CLI bundle.
bash-3.2$ curl "https://s3.amazonaws.com/aws-cli/awscli-bundle.zip" -o "awscli-bundle.zip"
  % Total    % Received % Xferd  Average Speed   Time    Time     Time  Current
                                 Dload  Upload   Total   Spent    Left  Speed
100 11.1M  100 11.1M    0     0  5598k      0  0:00:02  0:00:02 --:--:-- 5600k
Step-3.
Unzip awscli-bundle.zip.
bash-3.2$ unzip awscli-bundle.zip
Archive:  awscli-bundle.zip
replace awscli-bundle/install? [y]es, [n]o, [A]ll, [N]one, [r]ename: A
  inflating: awscli-bundle/install
  inflating: awscli-bundle/packages/botocore-1.12.145.tar.gz
  inflating: awscli-bundle/packages/futures-3.2.0.tar.gz
  inflating: awscli-bundle/packages/docutils-0.14.tar.gz
  inflating: awscli-bundle/packages/virtualenv-15.1.0.tar.gz
  inflating: awscli-bundle/packages/urllib3-1.22.tar.gz
  inflating: awscli-bundle/packages/rsa-3.4.2.tar.gz
  inflating: awscli-bundle/packages/urllib3-1.24.3.tar.gz
  inflating: awscli-bundle/packages/ordereddict-1.1.tar.gz
  inflating: awscli-bundle/packages/simplejson-3.3.0.tar.gz
  inflating: awscli-bundle/packages/s3transfer-0.2.0.tar.gz
  inflating: awscli-bundle/packages/python-dateutil-2.6.1.tar.gz
  inflating: awscli-bundle/packages/jmespath-0.9.4.tar.gz
  inflating: awscli-bundle/packages/PyYAML-3.13.tar.gz
  inflating: awscli-bundle/packages/argparse-1.2.1.tar.gz
  inflating: awscli-bundle/packages/pyasn1-0.4.5.tar.gz
  inflating: awscli-bundle/packages/colorama-0.3.9.tar.gz
  inflating: awscli-bundle/packages/python-dateutil-2.8.0.tar.gz
  inflating: awscli-bundle/packages/awscli-1.16.155.tar.gz
  inflating: awscli-bundle/packages/six-1.12.0.tar.gz
  inflating: awscli-bundle/packages/setup/setuptools_scm-1.15.7.tar.gz
Step-4.
Run installer as a sudoer.
bash-3.2$ sudo ./awscli-bundle/install -i /usr/local/aws -b /usr/local/bin/aws
Password:
Running cmd: /usr/bin/python virtualenv.py --no-download --python /usr/bin/python /usr/local/aws
Running cmd: /usr/local/aws/bin/pip install --no-cache-dir --no-index --find-links file:///Users/crunchify/Documents/ansible/awscli-bundle/packages/setup setuptools_scm-1.15.7.tar.gz
Running cmd: /usr/local/aws/bin/pip install --no-cache-dir --no-index --find-links file:///Users/crunchify/Documents/ansible/awscli-bundle/packages awscli-1.16.155.tar.gz
Symlink already exists: /usr/local/bin/aws
Removing symlink.
You can now run: /usr/local/bin/aws --version
Step-5.
Verify. How to check if Amazon CLI is installed successfully?
bash-3.2$ aws --version
aws-cli/1.16.155 Python/2.7.10 Darwin/18.5.0 botocore/1.12.145
That’s it. You are all set. Amazon CLI is successfully installed now.
Setup Amazon AWS Console & AWS CLI:
- Go to:
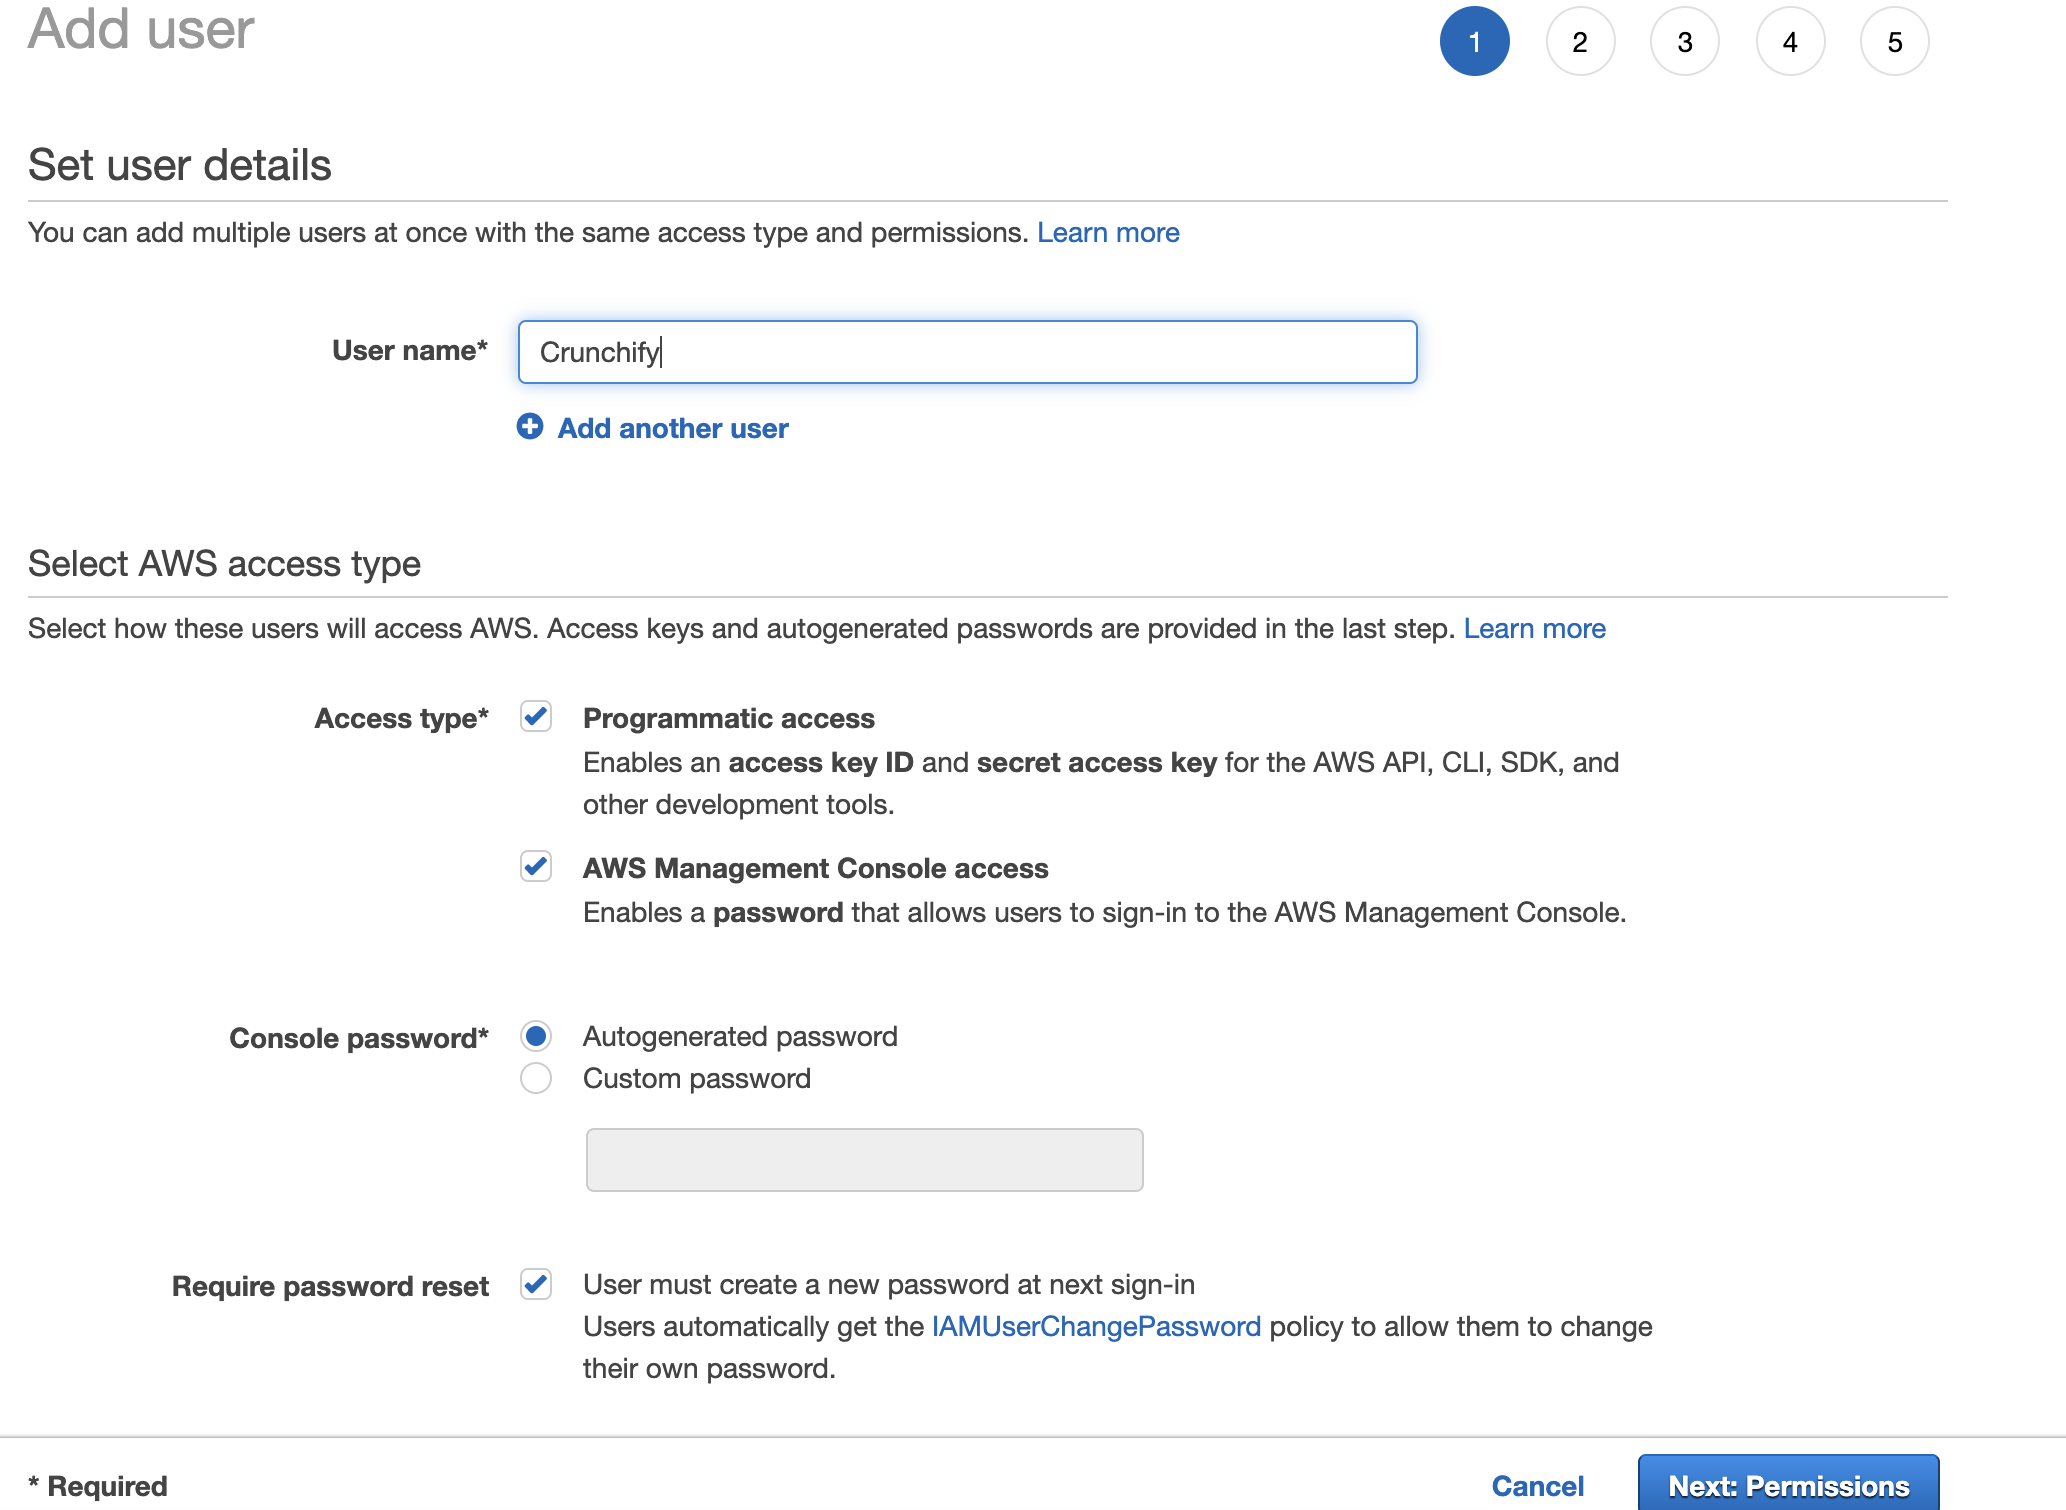
https://console.aws.amazon.com/iam/home?#/users - Create user

Set permissions

Download Amazon AWS Access Key ID, Secret Access Key

Just type aws configure command. Enter your Amazon Access key ID and Secret access key.
bash-3.2$ aws configure
AWS Access Key ID [****************QTOR]:
AWS Secret Access Key [****************4taa]:
Default region name [us-east-2]:
Default output format [json]:
And you are all set. You have successfully setup Amazon AWS CLI.
Run your first Amazon AWS CLI command:

As you see above, I do have one Amazon EC2 instance up and running, use describe-instances command to get all details about instance.
bash-3.2$ aws ec2 describe-instances
{
	"Reservations": [
		{
			"Instances": [{
					"Monitoring": {
						"State": "disabled"
					},
					"PublicDnsName": "",
					"StateReason": {
						"Message": "Client.UserInitiatedShutdown: User initiated shutdown",
						"Code": "Client.UserInitiatedShutdown"
					},
					"State": {
						"Code": 48,
						"Name": "terminated"
					},
					"EbsOptimized": false,
					"LaunchTime": "2019-05-09T12:33:20.000Z",
					"ProductCodes": [],
					"CpuOptions": {
						"CoreCount": 1,
						"ThreadsPerCore": 1
					},
					"StateTransitionReason": "User initiated (2019-05-10 15:33:23 GMT)",
					"InstanceId": "i-02f2a6661658d3ef2",
					"EnaSupport": true,
					"ImageId": "ami-06088b0de148c2bac",
					"PrivateDnsName": "",
					"KeyName": "crunchify",
					"SecurityGroups": [],
					"ClientToken": "",
					"InstanceType": "t2.micro",
					"CapacityReservationSpecification": {
						"CapacityReservationPreference": "open"
					},
					"NetworkInterfaces": [],
					"Placement": {
						"Tenancy": "default",
						"GroupName": "",
						"AvailabilityZone": "us-east-2a"
					},
					"Hypervisor": "xen",
					"BlockDeviceMappings": [],
					"Architecture": "x86_64",
					"RootDeviceType": "ebs",
					"RootDeviceName": "/dev/sda1",
					"VirtualizationType": "hvm",
					"Tags": [{
						"Value": "worker",
						"Key": "Name"
					}],
					"HibernationOptions": {
						"Configured": false
					},
					"AmiLaunchIndex": 0
				},
				{
					"Monitoring": {
						"State": "disabled"
					},
					"PublicDnsName": "ec2-18-188-240-188.us-east-2.compute.amazonaws.com",
					"State": {
						"Code": 16,
						"Name": "running"
					},
					"EbsOptimized": false,
					"LaunchTime": "2019-05-09T12:33:20.000Z",
					"PublicIpAddress": "18.188.240.188",
					"PrivateIpAddress": "172.31.1.223",
					"ProductCodes": [],
					"VpcId": "vpc-8b4655e3",
					"CpuOptions": {
						"CoreCount": 1,
						"ThreadsPerCore": 1
					},
					"StateTransitionReason": "",
					"InstanceId": "i-0e19bc4bb04173c6a",
					"EnaSupport": true,
					"ImageId": "ami-06088b0de148c2bac",
					"PrivateDnsName": "ip-172-31-1-223.us-east-2.compute.internal",
					"KeyName": "crunchify",
					"SecurityGroups": [{
						"GroupName": "launch-wizard-4",
						"GroupId": "sg-06bd2ee5d14e38797"
					}],
					"ClientToken": "",
					"SubnetId": "subnet-c2447faa",
					"InstanceType": "t2.micro",
					"CapacityReservationSpecification": {
						"CapacityReservationPreference": "open"
					},
					"NetworkInterfaces": [{
						"Status": "in-use",
						"MacAddress": "02:e4:a8:93:ad:56",
						"SourceDestCheck": true,
						"VpcId": "vpc-8b4655e3",
						"Description": "",
						"NetworkInterfaceId": "eni-0b57a08339236e849",
						"PrivateIpAddresses": [{
							"PrivateDnsName": "ip-172-31-1-223.us-east-2.compute.internal",
							"PrivateIpAddress": "172.31.1.223",
							"Primary": true,
							"Association": {
								"PublicIp": "18.188.240.188",
								"PublicDnsName": "ec2-18-188-240-188.us-east-2.compute.amazonaws.com",
								"IpOwnerId": "amazon"
							}
						}],
						"PrivateDnsName": "ip-172-31-1-223.us-east-2.compute.internal",
						"InterfaceType": "interface",
						"Attachment": {
							"Status": "attached",
							"DeviceIndex": 0,
							"DeleteOnTermination": true,
							"AttachmentId": "eni-attach-06cb447cd085d5818",
							"AttachTime": "2019-05-09T12:33:20.000Z"
						},
						"Groups": [{
							"GroupName": "launch-wizard-4",
							"GroupId": "sg-06bd2ee5d14e38797"
						}],
						"Ipv6Addresses": [],
						"OwnerId": "600038600370",
						"PrivateIpAddress": "172.31.1.223",
						"SubnetId": "subnet-c2447faa",
						"Association": {
							"PublicIp": "18.188.240.188",
							"PublicDnsName": "ec2-18-188-240-188.us-east-2.compute.amazonaws.com",
							"IpOwnerId": "amazon"
						}
					}],
					"SourceDestCheck": true,
					"Placement": {
						"Tenancy": "default",
						"GroupName": "",
						"AvailabilityZone": "us-east-2a"
					},
					"Hypervisor": "xen",
					"BlockDeviceMappings": [{
						"DeviceName": "/dev/sda1",
						"Ebs": {
							"Status": "attached",
							"DeleteOnTermination": true,
							"VolumeId": "vol-077e7eb58ca59daea",
							"AttachTime": "2019-05-09T12:33:20.000Z"
						}
					}],
					"Architecture": "x86_64",
					"RootDeviceType": "ebs",
					"RootDeviceName": "/dev/sda1",
					"VirtualizationType": "hvm",
					"Tags": [{
						"Value": "Crunchify",
						"Key": "Name"
					}],
					"HibernationOptions": {
						"Configured": false
					},
					"AmiLaunchIndex": 1
				}
			],
			"ReservationId": "r-00163c475d0a29a3d",
			"Groups": [],
			"OwnerId": "600038600370"
		}
	]
}
And that’s it. You are all set. You have successfully performed all below tasks:
- Install Amazon AWS CLI
- Setup Amazon AWS CLI
- Executed your 1st command and got result
Let me know if you face any issue running AWS AWS CLI command.
