There were lots of buzz about Google AMP in recent days. Google officially announced AMP pages support as part of Mobile Search page. It’s really interesting. So far I avoided implementing AMP on Crunchify for some reason and never felt any importance of it.
But after looking at Barry’s tweet I’ve decided AMPlify Crunchify too.
Are you looking for AMP and WordPress tips? Do you want to AMP Up Your WordPress Site with Google’s Accelerated Mobile Pages? Or do you want to install AMP in WordPress? In this tutorial we will go over steps on how to AMPlify your WordPress site with all detailed steps.
What is an Accelerated Mobile Pages (AMP)?
The Accelerated Mobile Pages (AMP) Project is an open source project created keeping speed in mind which creates mobile optimized content once and have it load instantly everywhere. There is no JavaScript loading at all on page. There is very minimal CSS loading with tight restrictions. One of the observation I noticed you can’t even use !important in CSS.
Have any of below questions?
- Google AMP: What Is It and Is It Right for Your WordPress Website
- Best way to Set up WordPress for AMP
- How to start with Google AMP pages and WordPress
- Accelerated mobile pages WordPress plugin
- WordPress amp pages
- Yoast amp glue and WordPress queries
Let’s get started: Enable AMP for your WordPress Posts
Step-1
Install official AMP plugin.

- Once activated you are all set. You wont see any option menu.
- You have to go to
Settings-> Permalinks menu. ClickSave Changeswithout making any changes.
Official AMP Plugin provides basic functionality and all of your posts will be AMPlify automatically. You could visit AMPlified version of your posts by adding /amp/ at the end of any Post URL.
Take a look at example:
OriginalPost URL: https://crunchify.com/how-to-sort-hashmap-by-key-and-value-in-java8-complete-tutorial/AMPlifyPost URL: https://crunchify.com/how-to-sort-hashmap-by-key-and-value-in-java8-complete-tutorial/amp/
Step-2
Install Glue for Yoast SEO & AMP plugin. Starting version 0.4 AMP WordPress version I believe, you don’t need any other AMP related plugin.
Now:
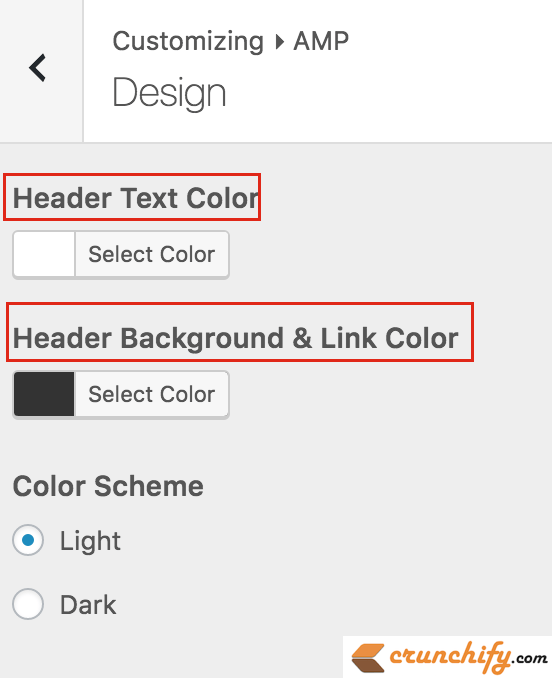
- Go to
Appearance -> AMP. - Provide
HeaderandBackgroundcolor and click onSave.
Step-3
Only problem I see with this plugin is that it adds Powered by WordPress link at the bottom of page. In order to change it you may want to change footer.php page with below code.
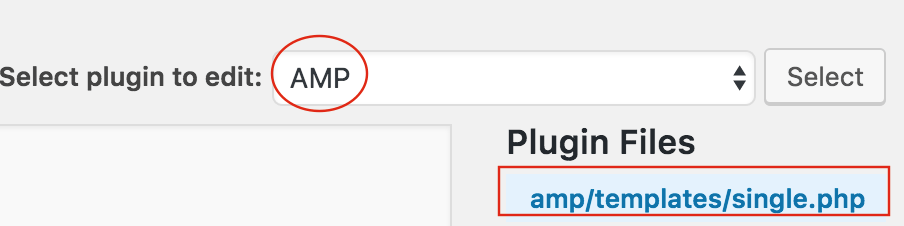
- Go to
Plugins->Editor - Select Plugin
AMP - Select file amp/templates/
footer.php
<footer class="amp-wp-footer"> <div> <h2><?php echo esc_html( $this->get( 'blog_name' ) ); ?></h2> <p> Copyright <i class="fa fa-copyright" aria-hidden="true"></i> 2012-16 <a href="https://crunchify.com">Crunchify, LLC.</a> • <a href="https://crunchify.com/sitemap/" target="_blank">Archives</a> • <a href="https://crunchify.com/advertise/" target="_blank">Advertise</a> </p> <a href="#top" class="back-to-top"><?php _e( 'Back to top', 'amp' ); ?></a> </div> </footer>
Modify copyright line code as per your need 🙂

Step-4
Add Analytics and Social Media icons to your AMP pages.
crunchify_amp_add_analytics_social_ads_jsfunction will add required analytics and social mediajavascriptcode to your amp page.crunchify_amp_add_analytics_social_codefunction will add actual your analytics code and social media icons.- Make sure you update your
Google Analytics Universal tracking IDandFacebook App IDbelow.
// ~~~~~~~~~~~~~~~~~~~~~ AMP Changes Start ~~~~~~~~~~~~~~~~~~~
add_action( 'amp_post_template_head', 'crunchify_amp_add_analytics_social_ads_js' );
function crunchify_amp_add_analytics_social_ads_js( $amp_template ) {
	$post_id = $amp_template->get( 'post_id' );
	?>
	<script async custom-element="amp-analytics" src="https://cdn.ampproject.org/v0/amp-analytics-0.1.js"></script>
	<script async custom-element="amp-social-share" src="https://cdn.ampproject.org/v0/amp-social-share-0.1.js"></script>
	<?php
}
add_action( 'amp_post_template_footer', 'crunchify_amp_add_analytics_social_code' );
function crunchify_amp_add_analytics_social_code( $amp_template ) {
    $post_id = $amp_template->get( 'post_id' );
    ?>
	<amp-analytics type="googleanalytics" id="analytics1">
	<script type="application/json">
	{
	  "vars": {
		"account": "UA-43876549-1"    // Modify universal tracking ID
	  },
	  "triggers": {
		"trackPageview": {
		  "on": "visible",
		  "request": "pageview"
		}
	  }
	}
	</script>
	</amp-analytics>

  // Social Media Code
  <div align="center">
    <amp-social-share type="twitter"
        width="30"
        height="30"> </amp-social-share>
    <amp-social-share type="gplus"
        width="30"
        height="30"></amp-social-share>
    <amp-social-share type="facebook"
        width="30"
        height="30"
        data-param-app_id="509582389234904"></amp-social-share>  // Modify your App ID
  </div>
    <?php
}
// ~~~~~~~~~~~~~~~~~~~~~ AMP Changes End ~~~~~~~~~~~~~~~~~~~
Step-5
Add Google Adsense Code to your AMP page. In my case, I wanted to add 300x250 Adsense code below featured image. There isn’t any official hook available to use so I modified, single.php file located at <AMP Plugin directory>/amp/templates/single.php.
- Go to
PluginsMenu - Click
Editor - Choose
AMPPlugin - Go to
single.phpfile - Add Adsense code as shown in below code snippet. Just
look for line featured-imageand add Adsense code after that.
<?php $this->load_parts( array( 'featured-image' ) ); ?>

// Adsense code START
<br><div align="center">
<amp-ad width=300 height=250
type="adsense"
data-ad-client="ca-pub-xxxxxxxxxxxxxxxx"
data-ad-slot="0110036438">
<div placeholder></div>
<div fallback></div>
</amp-ad>
</div>
// Adsense code END

<div class="amp-wp-article-content">
And you are all set. Just clean your site cache and check out live AMP page. You will see all Google Analytics, Adsense and Social Media icons working properly 🙂
Now what?
Let’s verify and check your AMP page for any issue. Go to https://validator.ampproject.org/ and check result.

How is Google going to Crawl AMP Post pages?
Now you have both AMP and non-AMP versions of your pages, AMP Plugin will add below relation meta tag to your both pages automatically.
Check this on non-AMP page
You should see reference of AMP version of the page to let Google and other platforms know about it:
<link rel="amphtml" href="https://crunchify.com/how-to-sort-hashmap-by-key-and-value-in-java8-complete-tutorial/amp/">

Check this on AMP page
You should see text to reference its non-AMP canonical version:
<link rel="canonical" href="https://crunchify.com/how-to-sort-hashmap-by-key-and-value-in-java8-complete-tutorial/">

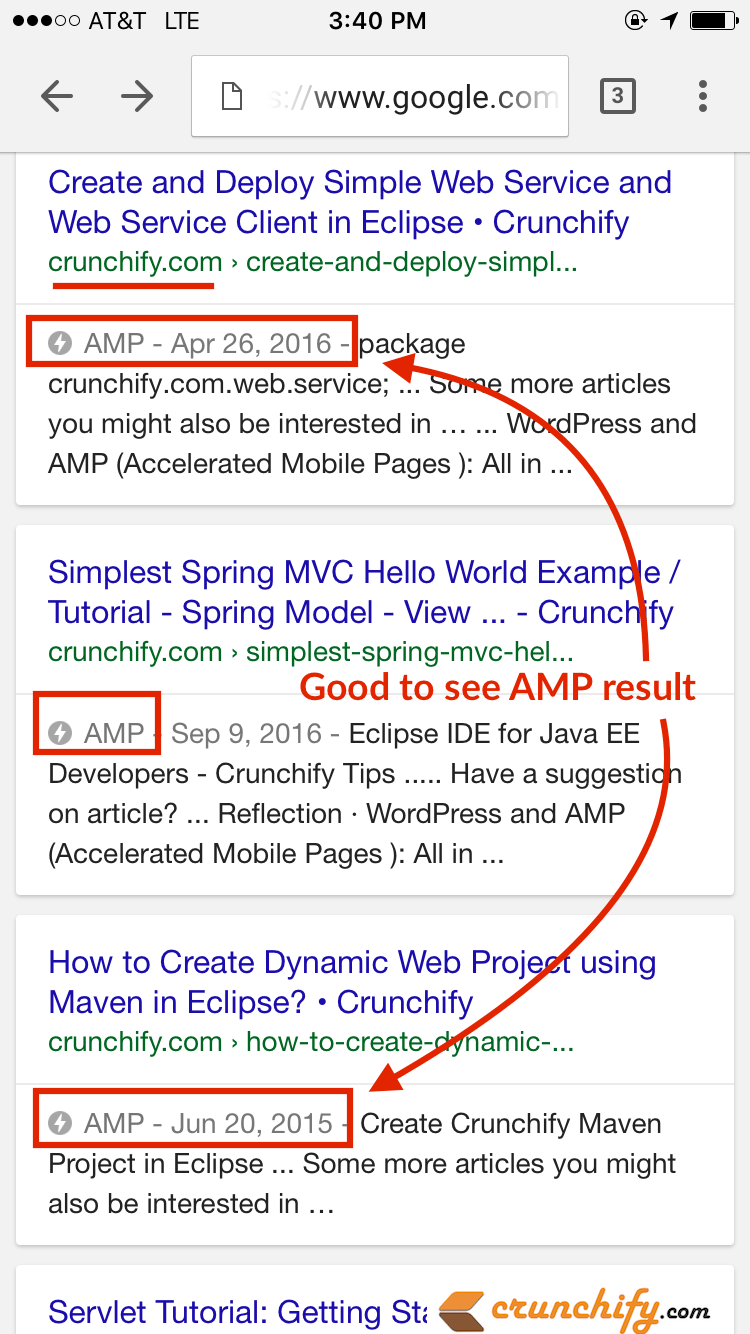
Now let’s wait for couple of days or at-least a week and you should see AMPlify pages in Google Search Console. For me it’s just 4 days and I see almost 500 pages already indexed for AMP result 🙂

How to check live result?
Just search for post in Google on mobile browser and you should see AMP result in Search Result Page.
Also, keep visiting this page or bookmarked as I’ll keep updating this tutorial over time as per my learning. Happy blogging and help speed up the net.